©XSIBackup Classic Quickstart Guide
©ESXi 5.0 (Windows GUI)
 Please note that this post is relative to old deprecated software ©XSIBackup-Classic. Some facts herein contained may still be applicable to more recent versions though.
For new instalations please use new ©XSIBackup which is far more advanced than ©XSIBackup-Classic.
There is a more recent document here: for ©ESXi 6.0 and above
We have designed XSIBackup to be really easy to use, assuming you have some little knowledge of using a Linux command line and editing files with the "vi" editor. Nevertheless some users have asked us to ilustrate the first steps with XSIBackup a bit more. The official manpage (http://33hops.com/xsibackup-help-man-page.html) in any case will still be there and is the main reference in regards to the program's usage.
You can also follow this Youtube video tutorial to learn how to install XSIBackup.
Preparing:
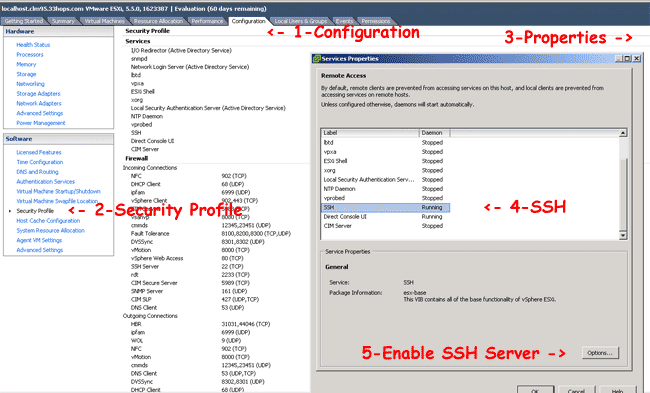
First of all you need to enable SSH access to your ESXi Box, you can acomplish this a in a few simple steps that we have condensed in a single screenshot. You should have no problems activating the SSH Server (SSH), its a very straightforward procedure.

Installing:
Of course you can use whatever method you prefer to copy the program to your ESXi box and to grant the apropiate permissions for it to be executable, but..., if you need some advice on how to do it really quick or you are fairly new to this world, we recommend you get a download key here:
http://33hops.com/xsibackup-vmware-esxi-backup.html
And use the straight installation script that you will receive in your e-mail.
Once you have completed all of the above steps you can simply run:
esxi-host# ./xsibackup
and see the help printing out in the screen. If you can see the help on screen then you have successfully installed XSIBackup in your ESXi Box
Next Steps:

1 - Now that you have installed XSIBackup in your ESXi system you might want to link it to a second ESXi host so that you can mirror your virtual machines there every night. If this is your case run this command:
esxi-host# ./xsibackup --link-srv=[second.esxi.system.ip]
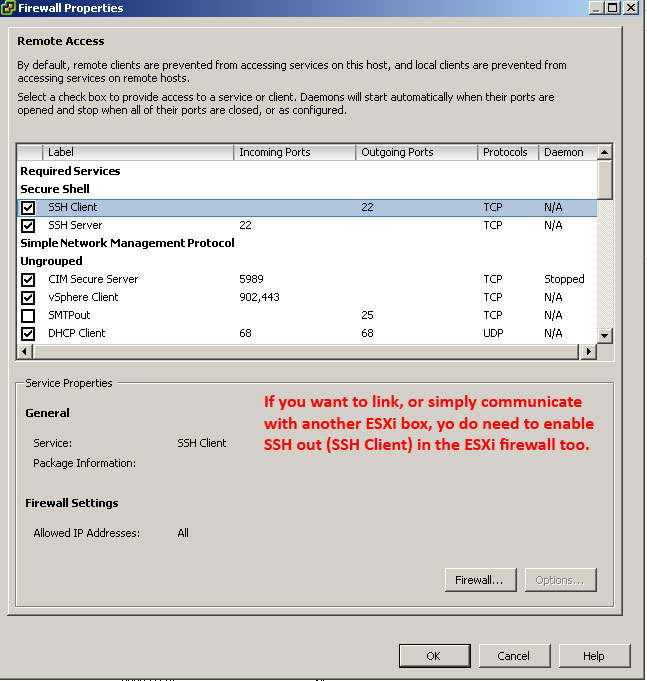
ATENTION: to link to a second box you do need to enable SSH client on the ESXi firewall.
This will generate a DSA key at the local host and copy it over to the secondary machine's authorized_keys file so that both machines can communicate passwordlessly. Provide the secondary host's password when prompted.
2 - Whether or not you wish to link your box to another one you will most likely want to activate XSIBackup's cron so that scheduled backups can take place, if so please run this.
esxi-host# ./xsibackup --install-cron
This last command will install XSIBackup's crontab to the file xsibackup-cron. You can later add lines into this file to schedule the backups you need.
3 - Let's get to the matter. The best way you can test XSIBackup's functionality is by issuing a command with the --test-mode=true parameter. This will simulate a backup process and send a faked e-mail report at the end (if you provided the e-mail submission arguments).
esxi-host# ./xsibackup --backup-point=/vmfs/volumes/backup --backup-type=running --mail-from=email.sender@yourdomain.com --mail-to=email.recipient@anotherdomain.com --smtp-srv=smtp.yourserver.com --smtp-port=25 --smtp-usr=username --smtp-pwd=password --test-mode=true
This command will fake a backup and send an e-mail to the address provided through the defined SMTP server. Since some time ago XSIBackup can use SMTP TLS security, you can add --smtp-sec=TLS to the chain of arguments if you want your SMTP communication to be tunneled through TLS.
Daniel J. García Fidalgo
33HOPS


