©XSIBackup Classic Quickstart Guide
©ESXi 6.0 and above with (Web GUI)
 Please note that this post is relative to old deprecated software ©XSIBackup-Classic. Some facts herein contained may still be applicable to more recent versions though.
For new instalations please use new ©XSIBackup which is far more advanced than ©XSIBackup-Classic.
In this document we'll explain how to enable SSH access on your ESXi host and install ©XSIBackup-Free & Pro.
Don't forget to read the Man Page: http://33hops.com/xsibackup-help-man-page.html to have access to a full list of ©XSIBackup arguments and options.
1/ Enable SSH access
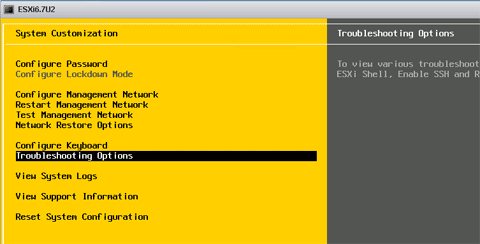
Method 1: use the console menu This is most probably the easiest way to activate SSH access to your ESXi host. Just navigate to "Troubleshooting Options" and click enter.Once you have gained access to your ESXi box via SSH installing ©XSIBackup is a trivial task.

You will see a simple submenu where the second option is: "Enable SSH". If SSh is disabled you will see a notice on the right side of the page stating "SSH is Disabled", just hit enter to toggle the state of the service in the ESXi host.

When the SSH service has been enabled the notice changes to "SSH is Enabled".

Method 2: use the Web GUI
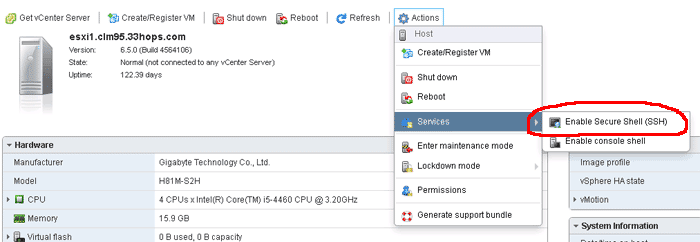
Once you have installed the vSphere host and you have access to it through your web browser, you can enable the SSH service through it.

From the main node (Host) on the left select "Actions" and navigate to the "Services" contextual menu, then click on "Enable Secure Shell (SSH)"
2/ Install ©XSIBackup-Free
To install XSIBackup on your ESXi host follow the directions below:
Get to the ©XSIBackup Product Page and download ©XSIBackup-Free

Enter your Name, Lastname and Email address and an install script will be sent to your e-mail address, you can just then cut & paste that script into your SSH client to get ©XSIBackup installed.
There are many free SSH clients in the Internet, nonetheless we recommend that you use Putty for Windows, should you happen to use Windows as your desktop OS. In case you use some other OS use any SSH client of your choice, but remember that you will have to configure your page code and some other options on your own.
Of course you can download the software package from the email link and use whatever method you prefer to copy the program to your ESXi box and to grant the appropiate permissions for it to be executable, but..., if you need some advice on how to do it really quick or you are fairly new to this world, we recommend you get a download key as explained above and that you cut&paste the installation script to your SSH session window
Once you have completed all of the above steps you can simply run:
esxi-host# ./xsibackup
and see the help printing out in the screen. If you can see the help on screen then you have successfully installed XSIBackup in your ESXi Box
Next Steps:
Now that you have installed XSIBackup in your ESXi system you might want to run your first backup, this will offer you the chance to get quickly into action and gain confidence. The easiest way to run a job is to backup all running VMs in your host, per instance. You can do so by running the following command:
esxi-host# ./xsibackup --backup-prog=Vmkfstools --backup-type=running --backup-point=/vmfs/volumes/backup-datastore
You will see some messages letting you know that no email report will be sent, as you have not yet configured any SMTP Server, you can safely ignore them by now.
All your running VMs will be detected and backed up
If you don't want to backup all running VMs on the first attempt, which would be more than reasonable, you may alternatively use the following command to backup some given VM by name
esxi-host# ./xsibackup --backup-prog=Vmkfstools --backup-type=custom --backup-vms="YOUR-VM-NAME" --backup-point="/vmfs/volumes/backup-datastore"
Daniel J. García Fidalgo
33HOPS


