


©VMWare ©ESXi mount .vmdk disks in linux
 Please note that we provide tools to perform granular recovery like
XSIGR,
bundled with every package (free and paid versions) without the need to comprehend the nitty gritty details of the process. This post is
here for more advanced users willing to comprehend every step and/or apply the logic to other virtualization systems.
Please note that we provide tools to perform granular recovery like
XSIGR,
bundled with every package (free and paid versions) without the need to comprehend the nitty gritty details of the process. This post is
here for more advanced users willing to comprehend every step and/or apply the logic to other virtualization systems.
How to mount a .vmdk disk in linux to access individual files
©Windows NTFS
To add support for the NTFS file system to our Linux server we need to add the NTFS-3G driver. It is directly available from our installed Linux repositories through the EPEL repository so we just issue the yum install command.
# Install EPEL release first
yum install epel-release
# Then ntfs-3g
yum -y install ntfs-3g;
There are several ways to achieve the same result, namely access contents in a virtual .vmdk disk. We have found the following procedure very straight forward and reliable. We will use the kpartx utility, which is included in CentOS 7 minimal install. Running the below command will attach the .vmdk file to a loopback device and show the partitions inside of it.
kpartx -a -v /mnt/xsifs/20200219185426/W702/W702-flat.vmdk
add map loop0p1 (253:3): 0 204800 linear /dev/loop0 2048
add map loop0p2 (253:4): 0 110940160 linear /dev/loop0 206848
add map loop0p1 (253:3): 0 204800 linear /dev/loop0 2048
add map loop0p2 (253:4): 0 110940160 linear /dev/loop0 206848
Now we can mount the partition we want to access in the .vmdk disk in some mount point like /mnt/guest. In our case we are accessing a Windows 7 .vmdk, thus we want to access the partition that contains the data: loop0p2, as loop0p1 will be the boot partition.
mount -o r /dev/mapper/loop0p2 /mnt/guest
From this moment we can access the contents of the Windows 7 virtual hard disk at /mnt/guest.
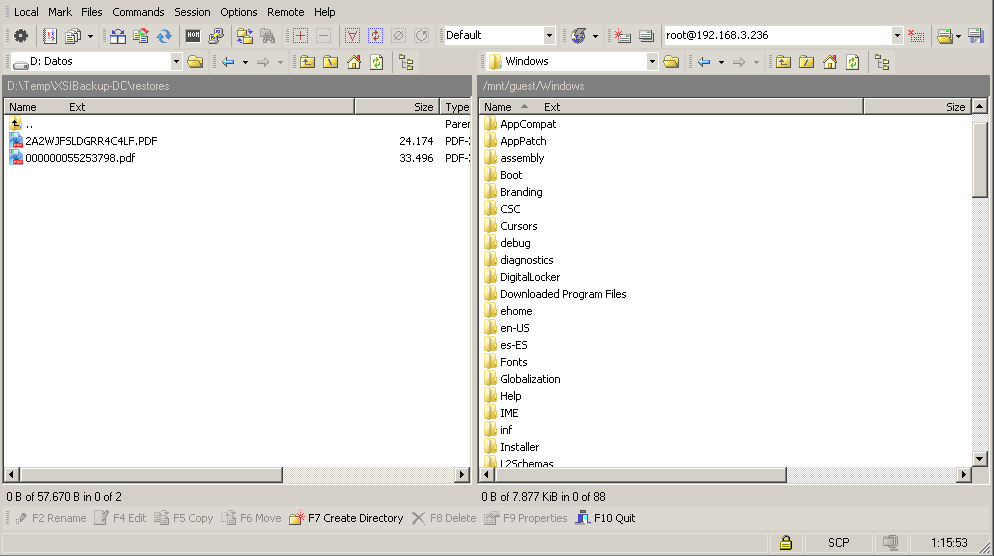
Given the fact that many people use Windows desktops to work, you can easily connect to the ©XSIBackup-DC server using any graphical SCP client, like WinSCP to browse the /mnt/guest dir and recover the files you want.
Linux LVM
In case you want to mount some linux LVM partition, you will need to first use kpartx to mount the virtual disk as a loop device.
kpartx -av /mnt/xsifs/20200221174813/LINUX-VM/LINUX-VM-flat.vmdk
Then scan for LVM logical volumes with lvscan
[root@XSINAS2 ~]# lvscan
ACTIVE '/dev/centos/swap' [2.00 GiB] inherit
ACTIVE '/dev/centos/home' [46.99 GiB] inherit
ACTIVE '/dev/centos/root' [50.00 GiB] inherit
ACTIVE '/dev/vg_crm/lv_root' [17.57 GiB] inherit
ACTIVE '/dev/vg_crm/lv_swap' [<1.94 GiB] inherit
ACTIVE '/dev/centos/swap' [2.00 GiB] inherit
ACTIVE '/dev/centos/home' [46.99 GiB] inherit
ACTIVE '/dev/centos/root' [50.00 GiB] inherit
ACTIVE '/dev/vg_crm/lv_root' [17.57 GiB] inherit
ACTIVE '/dev/vg_crm/lv_swap' [<1.94 GiB] inherit
Now simply mount the volume you want to access:
mount /dev/vg_LINUX-VM/lv_root /mnt/guest
And browse its contents to extract some file
[root@XSINAS2 ~]# ls -la /mnt/guest
total 120
dr-xr-xr-x. 24 root root 4096 Feb 5 20:13 .
drwxr-xr-x. 4 root root 32 Feb 21 18:50 ..
-rw-r--r-- 1 root root 0 Feb 5 20:13 .autofsck
-rw-r--r-- 1 root root 0 Aug 28 2016 .autorelabel
dr-xr-xr-x. 2 root root 4096 Sep 12 21:09 bin
drwxr-xr-x. 2 root root 4096 Aug 11 2016 boot
drwxr-xr-x. 2 root root 4096 Jul 12 2016 cgroup
drwxr-xr-x. 2 root root 4096 Aug 11 2016 dev
drwxr-xr-x. 70 root root 4096 Feb 5 20:13 etc
drwxr-xr-x. 4 root root 4096 Aug 16 2017 home
dr-xr-xr-x. 8 root root 4096 Aug 11 2016 lib
dr-xr-xr-x. 9 root root 12288 Aug 30 2016 lib64
drwx------. 2 root root 16384 Aug 11 2016 lost+found
drwxr-xr-x. 2 root root 4096 Sep 23 2011 media
drwxr-xr-x. 2 root root 4096 Sep 23 2011 mnt
drwxr-xr-x. 4 root root 4096 Aug 11 2016 opt
drwxr----- 3 root root 4096 Sep 11 13:49 .pki
drwxr-xr-x. 2 root root 4096 Aug 11 2016 proc
dr-xr-x---. 7 root root 4096 Oct 19 18:07 root
dr-xr-xr-x. 2 root root 12288 Aug 11 2016 sbin
drwxr-xr-x. 2 root root 4096 Aug 11 2016 selinux
drwxr-xr-x. 2 root root 4096 Sep 23 2011 srv
drwxr-xr-x. 2 root root 4096 Aug 11 2016 sys
drwxrwxrwt. 3 root root 4096 Feb 21 18:07 tmp
drwxr-xr-x. 13 root root 4096 Aug 11 2016 usr
drwxr-xr-x. 20 root root 4096 Aug 20 2017 var
Daniel J. García Fidalgo
33HOPS

