

|
Last updated on Tuesday 16th of November 2021 08:30:50 PM ©XSIBackup NAS Man Page: storageDownload from sourceforge.netAdd disks ©XSIBackup-NAS will detect any newly added disks and will display them in the Storage => Volumes menu page. They will also be displayed in the Storage => Info page, that is just informative though. You may add disks while the VM is on, this is ideal to keep some eventual previous storage volume in production while you add more. 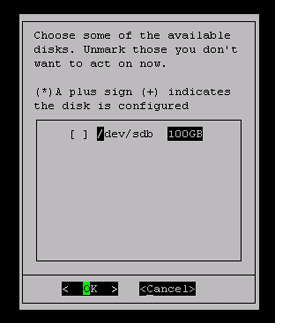 By marking the checkbox for a given disk you select it to create a volume in it. A plus sign (+) next to the disk name indicates that this disk is already configured,
thus by selecting an already configured disk you acknowledge that it is in use and that you whish to wipe its contents so that you can reuse it in a new volume.
By marking the checkbox for a given disk you select it to create a volume in it. A plus sign (+) next to the disk name indicates that this disk is already configured,
thus by selecting an already configured disk you acknowledge that it is in use and that you whish to wipe its contents so that you can reuse it in a new volume.
©XSIBackup-NAS creates a PV (Physical Volume) per disk, then it creates an LVM2 Volume Group in it and it leaves 10% of the space free. This is done by default by various reasons: • Due to the nature of SSDs and how they work, it is recommended to leave up to 25% of the disk always free. • Leaving 10% free on a regular HD will allow to have some space free to take LVM2 snapshots, which could be useful in many situations. Then a logical volume will be created on top of the 90% of space used from the Volume Group. So, do not worry if you notice that not all your available space was taken in the process. Once the Logical Volume has been created, you will need to decide how you want to use that space in your virtualization host. ©VMWare ©ESXi basically offers two ways to connect to storage resources, apart from local disks: NFS and iSCSI. 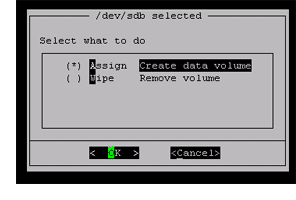 Next screen will ask whether you want to just wipe the disk or you want to create some resource that you can use from an ©ESXi host. Wipe will do just that,
while assign will take you to a confirmation prompt where you will have to finally agree to destroy the data. You will receive a confirmation stating that the LVM2
Logical Volume was created. ©XSIBackup-NAS automatically names all resources for you based on the disk name assigned by the Operating System.
Next screen will ask whether you want to just wipe the disk or you want to create some resource that you can use from an ©ESXi host. Wipe will do just that,
while assign will take you to a confirmation prompt where you will have to finally agree to destroy the data. You will receive a confirmation stating that the LVM2
Logical Volume was created. ©XSIBackup-NAS automatically names all resources for you based on the disk name assigned by the Operating System.
Next step consists in choosing NFS or iSCSI as the data transport protocol. You should know by now which kind of protocol to use depending on your needs, we will summarize by just saying that you should choose iSCSI if you want to host VM in the volume and NFS if you want to use it to backup VMs. Apart of the convenience of using ©XSIBackup-NAS as a VM storage pool, you can use it for any other purpose that you may find it useful for: such as a file server, per instance. iSCSI LUN When you add an iSCSI LUN the GUI takes care of invoking the targetcli binary to build an iSCSI resource that is already configured to work with ESXi. It lacks any authentication, thus you may need to access the targetcli binary from the command line to add some username and password if you need them. 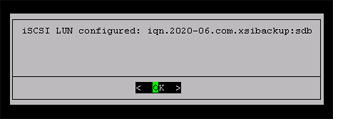 Now you just need to attach the iSCSI resource as a disk to ©ESXi. This is not very intuitive, specially in the new ©ESXi web GUI. We will cover that procedure
in the next screen captures.
Now you just need to attach the iSCSI resource as a disk to ©ESXi. This is not very intuitive, specially in the new ©ESXi web GUI. We will cover that procedure
in the next screen captures.
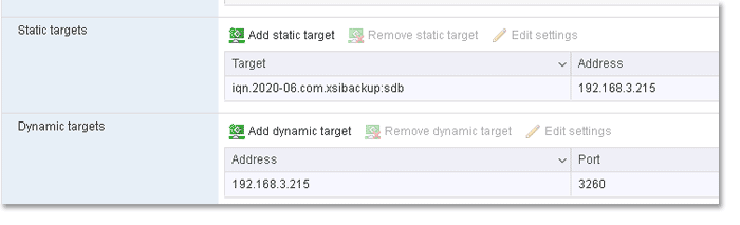
When you use a remote iSCSI LUN resource, what the iSCSI protocol does is to make the remote volume appear as a local block storage device, namely a hard disk. It will behave from most perspectives as just that, a hardware device connected to a local controller. In case of ©ESXi, iSCSI will be another way to format a block device as VMFS, which is interesting, as many ©ESXi features will depend on having the VMs running on top of this file system. Configure a remote iSCSI LUN in ©ESXi 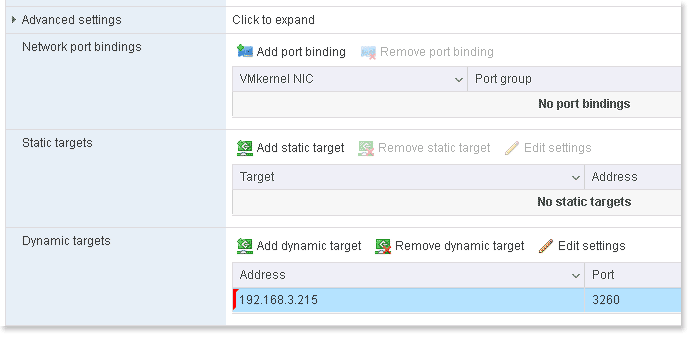 To configure an iSCSI disk in ©ESXi go to Storage => Adapters tab => Configure iSCSI. A window like the above will pop up. Just go to dynamic targets and add the IP
of the remote ©XSIBackup-NAS appliance. Click on "Save configuration", the window will close. Then click on Configure iSCSI again. If everything went right and no
firewall is blocking port 3260, you will see that a new resource Id IQN appeared in the Static Targets section. That means that the remote resource was detected and
automatically incorporated into the local host's available resources.
To configure an iSCSI disk in ©ESXi go to Storage => Adapters tab => Configure iSCSI. A window like the above will pop up. Just go to dynamic targets and add the IP
of the remote ©XSIBackup-NAS appliance. Click on "Save configuration", the window will close. Then click on Configure iSCSI again. If everything went right and no
firewall is blocking port 3260, you will see that a new resource Id IQN appeared in the Static Targets section. That means that the remote resource was detected and
automatically incorporated into the local host's available resources.
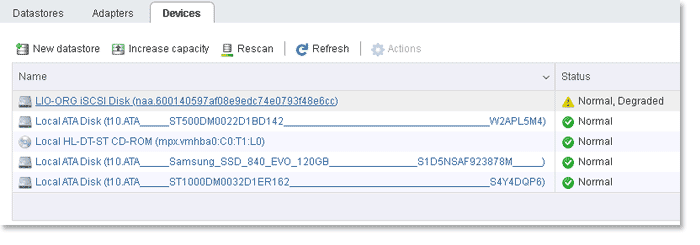
 If you now cancel and click on the Devices tab in the Storage section, you will see that a new resource has appeared. Most of the times it will have a notice
stating something like "Normal, Degraded". Don't worry, this just means that it has not yet been formatted with VMFS.
If you now cancel and click on the Devices tab in the Storage section, you will see that a new resource has appeared. Most of the times it will have a notice
stating something like "Normal, Degraded". Don't worry, this just means that it has not yet been formatted with VMFS.
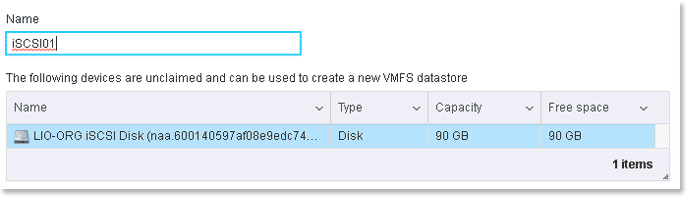
 Last step is to simply go to the Storage main tab titled Datastores and click on New datastore. A new window will pop up, just choose the first option
Create New VMFS datastore and click on Next. The following screen will show the resource previously listed as one of the available disks to configure. Name it
and click next.
Last step is to simply go to the Storage main tab titled Datastores and click on New datastore. A new window will pop up, just choose the first option
Create New VMFS datastore and click on Next. The following screen will show the resource previously listed as one of the available disks to configure. Name it
and click next.
 The next screen will allow you to select which VMFS version to use: 5 or 6. Depending on your needs you may choose one or the other. VMFS6 has the advantage that it's newer
and it offers automatic space reclamation, so that any space left free on any of the virtual disks is automatically reclaimed by the hypervisor.
The next screen will allow you to select which VMFS version to use: 5 or 6. Depending on your needs you may choose one or the other. VMFS6 has the advantage that it's newer
and it offers automatic space reclamation, so that any space left free on any of the virtual disks is automatically reclaimed by the hypervisor.
After completing the process the new disk will appear in the Storage section of the GUI and you will be able to use it to host VMs you create on the ©ESXi host. NFS, Network File System v. 3 and 4 NFS is probably the best data sharing protocol available. It is fast resilient and extremely flexible. ©ESXi allows to use a remote NFS share to host VMs although you will loose some of the features offered by VMFS, like automatic space reclamation in VMFS6 or the ability to jump over zeroed zones when using ©XSIBackup-Pro or ©XSIBackup-DC. You can create shares in ©XSIBackup-NAS and add them to your ©ESXi host. The first part of the process is similar as that of creating a ISCSI LUN: that is creating a PV, a Volume Group with 90% of the available space and finally an LVM2 Logical Volume on the 90% of remaining space. The only difference with regards to the iSCSI LUN set up is the last step of creating a share, in which you will select NFS. If you now add a new disk to ©XSIBackup-NAS and you go to Storage => Info, you will see a new empty disk in the report of disks and shares. 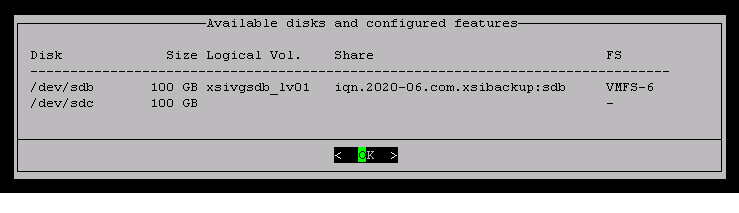
Now reproduce the same steps as in creating an iSCSI LUN but choose NFS instead at the end of the process. When you choose NFS you are required to format the volume using some file system. ©XSIBackup-NAS offers: XFS, ext4 and ext3. Any of them will be a great choice to store deduplicated backups, not so much to store VMs, still you can do the latter. Choose ext3 for maximum compatibility with older systems, choose ext4 for maximum speed, repository size and reliability, finally choose XFS if you want a more modern file system that offers both speed and growth potential. 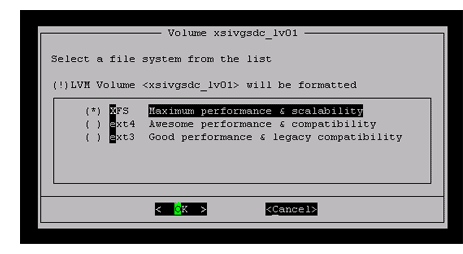 Once the volume is formatted you will be required to set the NFS share parameters, such as allowed network and NFS options. ©XSIBackup-NAS will configure both NFS3 and NFS4
protocols up to the highest version minor number supported by the CentOS 7 NFS stack. You will then be able to connect from ©ESXi or any other supported hypervisor or Operating System.
Once the volume is formatted you will be required to set the NFS share parameters, such as allowed network and NFS options. ©XSIBackup-NAS will configure both NFS3 and NFS4
protocols up to the highest version minor number supported by the CentOS 7 NFS stack. You will then be able to connect from ©ESXi or any other supported hypervisor or Operating System.
As in the case of iSCSI, the default values employed in setting up the NFS share ensure compatibility with the ©ESXi hypervisor. NFS3 will control access to the share by the allowed network IP with no user authentication, while NFS4 will ask you to enter user authentication. By default the volume configuration routine in ©XSIBackup-NAS will grant access to the root user, both in case of NFS4 and Samba/CIFS 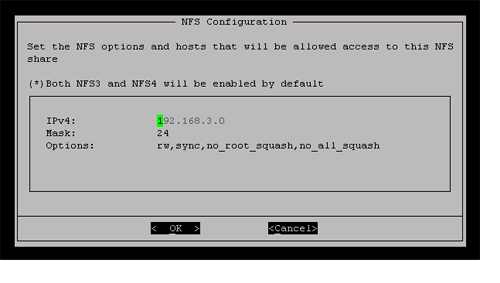 In the event that you desire to configure other users, you can use the user management tools in the ©XSIBackup-NAS GUI, you will need to use the shell to assign those permissions to
your shared folders though.
In the event that you desire to configure other users, you can use the user management tools in the ©XSIBackup-NAS GUI, you will need to use the shell to assign those permissions to
your shared folders though.
All folder structure is kept under /mnt: local shares, external shares and restore points. Thus, to modify the permissions of a NFS4 share belonging to an LVM2 volume that has in turn been created on top of a Volume Group of a Pysical Volume on a physical disk, just browse to /mnt/volumes/nfs/ and choose the share folder based on the disk name. Apart from the file system location of shares, you have a configuration file in /usr/xsi/gui/config/shares that holds the most relevant information on each of the shares. Configure a remote NFS share in ©ESXi As in the previous case with iSCSI, ©ESXi allows you to use some remote NFS file system to be turned into a local datastore via an NFS binding. You have the option to choose whether you want that share to be version 3 or 4. In case of NFS3, you will just need to pass the remote server's IP and share. That will instantly connect to the NFS share and show it as a local datastore in the ©ESXi file system. In case of the NFS4 protocol, you will need, on addition, to add a username and password on the remote file system. Root user is configured by default, any other user will just have read access to the share, thus you would need to, at least, assign write permissions to any user you want to employ on the shared resource present at /mnt/volumes/nfs/ To add an NFS datastore to ©ESXi, just click on New datastore under Storage in the ©ESXi Web GUI. Then choose the last option in the list: Mount NFS datastore. 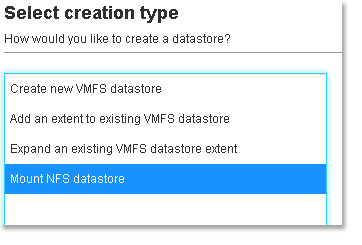 In the next screen you will be prompted to enter the remote IP and share, as well as the protocol version you wish to configure. If you choose NFS4, you will be additionally asked to enter a username
and password to mount the share. You will have to make sure that the username you are providing here exists on the remote NFS4 share and that it has the privileges required to mount it.
In the next screen you will be prompted to enter the remote IP and share, as well as the protocol version you wish to configure. If you choose NFS4, you will be additionally asked to enter a username
and password to mount the share. You will have to make sure that the username you are providing here exists on the remote NFS4 share and that it has the privileges required to mount it.
As previously stated, the root user is configured by default and you can use it to directly mount some NFS3 or NFS4 share, unless you have some stark requirements in regards to user access security. Network configuration Network access is a vital element to be able to access shares in ©XSIBackup-NAS. The appliance comes with a single 10GB nic as DHCP configured by default, which will be enough in most of the simplest the scenarios. That should offer you at least 700 to 800 MB/s in throughput. Apart from that ©XSIBackup-NAS allows you to easily create network bonds, so that you can aggregate multiple NICs to get more throughput. To configure additional NICs in ©XSIBackup-NAS, you must first add them to the VM in the ©ESXi host. You can do that while the VM is on as with disks, then get to the network configuration menu entry in ©XSIBackup-NAS and select Configure. The newly added NICs will be detected and shown in a list. You will then be able to enter any of them to configure a dynamic or static IP for each one of them. Bonding NICs into a single compounded interface 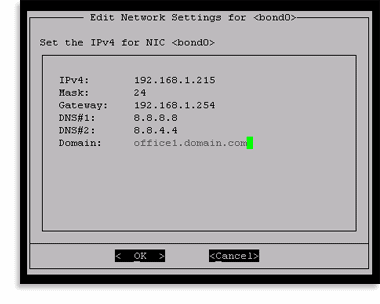 This is very convenient for single NICs, but having multiple NICs is usually intended to aggregate them into a single one to be able to achieve better throughput. You can bond NICs in the Bonding menu
entry in the networking section. When you choose this option, all NICs are presented with a checkbox next to them, thusly you can choose some of this NICs by ticking its checkbox and turn them into a bond.
This is very convenient for single NICs, but having multiple NICs is usually intended to aggregate them into a single one to be able to achieve better throughput. You can bond NICs in the Bonding menu
entry in the networking section. When you choose this option, all NICs are presented with a checkbox next to them, thusly you can choose some of this NICs by ticking its checkbox and turn them into a bond.
When you do, you receive some messages stating that the NICs have been turned into a slave to the bond and finally a new window where you can set the network configuration that will take the new NIC bond. Most of the times you won't need to reboot the appliance and the new values will take effect immediately. In case you are connected through an SSH client to a TTY, you will generally need to reconnect to the new IP in case that you changed it. If you keep the same IP for the bond that you were using to connect through SSH, Putty at least will be able to keep the connection open after the network service reboot. Bonding Modes There are a number of different bonding modes, depending on how packets arriving to the bond are treated, such as: round-robin, active/pasive, broadcast, etc... If you don't know which mode to choose, then select mode 0 (round-robin) 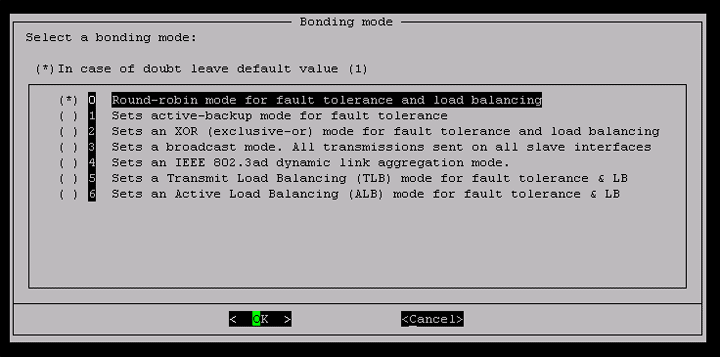
For details on each of the modes please read the following documents: https://access.redhat.com/documentation/en-us/red_hat_enterprise_linux/7/html/networking_guide/sec-using_channel_bonding https://access.redhat.com/documentation/en-us/red_hat_virtualization/4.3/html/technical_reference/bonding_modes Mount remote resources One common scenario you may face is that of having some ©XSIBackup-DC repositories in some server (LAN or Internet) and be willing to restore some files from them. The simplest way to achieve that goal by now is to mount the remote resource containing the repository data as NFS using the GUI. Of course you can also mount that remote share using any other method, protocol or fuse file system (Azure Blob, Amazon S3, etc...), but by now you would need to do that manually using the CentOS shell, thus we will focus in mounting a remote NFS share using the GUI.  To mount a remote share as NFS go to Storage => Mount (mount remote file system) => NFS. You will be asked to enter an IPv4 IP, then a list of the available shares will be printed out, so that you can select
which one to use.
To mount a remote share as NFS go to Storage => Mount (mount remote file system) => NFS. You will be asked to enter an IPv4 IP, then a list of the available shares will be printed out, so that you can select
which one to use.
Choose a share, the next screen will offer you a list of mount points to use. Be careful not to to use some mount point that is already being used by some other remote share or file system. Once the process completes you will see the new mounted remote file system in the Restore section. Thus, you will be able to choose it when restoring files and browse the contents of the ©XSIBackup-DC repositories stored there. We will add more options in the future, so that you can use different kinds of remote storage and mount them in some local folder to browse the contents of remote repos. 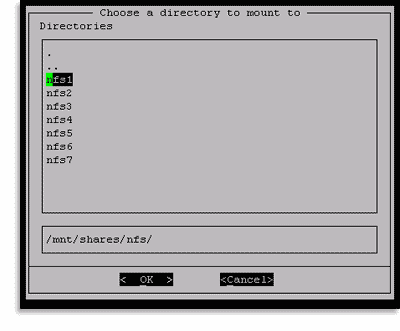 Each protocol has a set of folders where you can mount remote file systems, in case of NFS they will be named: nfs1, nfs2, and so on. They will appear by default when you get to the moment of choosing a mount point.
You can of course use any other mount point in the local file system that is empty, we recommend that you abide to the proposed set of folders though, in sake of orderliness, otherwise things can really tangle up once you have some mount points set up. You can also browse the mount points in Storage => Mounts. From there you will also be able to browse the contents or to unmount the remote file system when you are done usig it. |


|
Login • Available in: 