

|
Last updated on Thursday 29th of June 2023 12:19:08 PM ©XSIBackup-App, add NFS or CIFS volumesHow to backup ©VMWare ©ESXi virtual machines to NFS or Windows shares
What is ©XSIBackup-App
It is an appliance based in Linux CentOS 7 Operating System including ©XSIBackup 2.0 and an nCurses GUI.
It is able to backup VMs stored in any ©VMWare ©ESXi host 5.5 or above reachable over SSH protocol.
You can download it from Sourceforge.
In this post we are going to cover how to add NFS and CIFS (AKA SMB/ Windows) protocol volumes to ©XSIBackup-App from the command line. Mounting an NFS shareNFS is an acronym for Network Fine System. It is a technology first developed for UNIX systems in the 80s. There are multiple versions of it, NFS3 and NFS4 are the ones that remain in use nowadays. In short, the main difference between NFS3 and NFS4 is multipathing, namely: using more than one NIC at the same time to increase available bandwidth between the client and the server. Most recent Linux distros will produce an NFS4 mount by default when using the standard commands without specifying the version. Mounting a remote NFS share from the GUI is a trivial task. You can have more control when you do so from the command line though.  Mount a remote NFS share from the GUI
Nonetheless the procedure to mount a remote NFS share from the command line is even simpler than using the GUI. To list the mounts available at some remote server you use the showmount command
[root@XSIBackup-App ~]# showmount -e 192.168.33.203
Export list for 192.168.33.203: /mnt/nfs/SSD 192.168.33.0/24 /mnt/nfs/4TB 192.168.33.0/24 Then, to mount one of the remote shares you use the following command from the appliance
mount -t nfs -o vers=4.1 192.168.33.203:/mnt/nfs/4TB /mnt/XSI/nfs/mount1
You can specify the protocol version to use, in this case we set it to v. 4.1 Mounting NFS over a firewallDue to the complexity of the NFS protocol sysadmins don't usually mount NFS over a firewall. Apart from its complexity you have the security concerns, as NFS is not encrypted by default. It's easier to use it tunnelled in a VPN, still some high latency will make NFS reduce its effective throughput dramatically. For such cases you should take a different approach, like backing up over IP/SSH. If you still want to give it a try, you can start at this Serverfault post Mounting a Windows share, AKA: SMB, Samba or CIFSPlease, note that backing up to some CIFS share will not perform, not even close, to an NFS share with an underlying XFS or ext4 file system.
You can find a feature to mount SMB shares in the nCurses GUI. Just as long as you have shared some folder in some Windows Server and you have the user name and password to connect, doing so should be trivial. 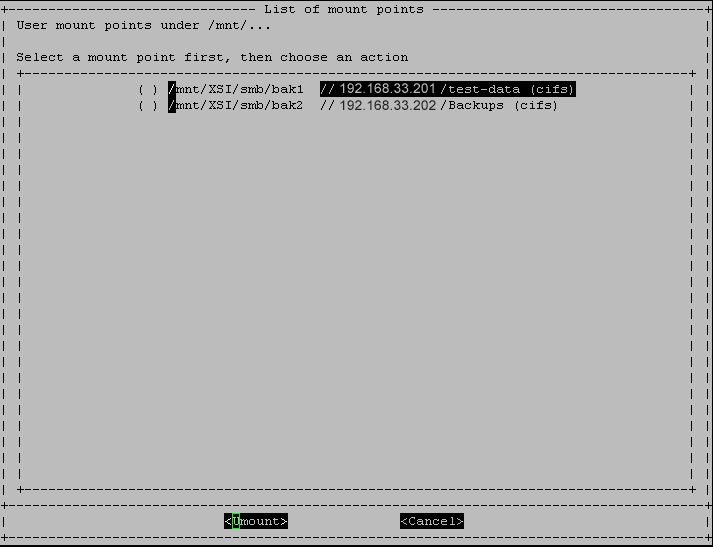 SMB/CIFS mount points as seen in the GUI
Nonetheless since v. 1.0.0.7 the GUI tries to connect using the lowest available version of the protocol (SMB2) to maximize compatibility, thus you may find some issue if you try to connect to some more recent version of the protocol (SMB3) in some server that offers no backward compatibility. By doing things in the command line you have full control on all the options offered by the CIFS client. Listing CIFS shares available at some IPBefore trying to mount the remote share we are going to see how to list shares available at some remote server. Then we'll pick one of them and mount it in the ©XSIBackup-App file system, so that you can use it as a locally available volume.
[root@XSIBackup-App ~]# smbclient -L 192.168.33.201 -U administrator
Enter XSIBACKUP\administrator's password: Sharename Type Comment --------- ---- ------- ADMIN$ Disk Remote Admin C$ Disk Default share IPC$ IPC Remote IPC test-data Disk We used the smbclient utility, which is already installed in the appliance. You just have to pass it the -L (list) along with the username (-U). test-data is the name of the share we want to mount, we'll jot it down by now. Mounting a CIFS shareWe offer the possibility to mount CIFS shares as some value added feature by now. Nevertheless you must understand that to host deduplicated repositories and even sets of replicas, the only recommended file systems are: XFS and ext4. NTFS is way slower than the latter and will only slow down your data transfers. To mount the CIFS share we use the mount command, passing it the -t cifs parameter. Then the \\IP\share in the remote server. Next comes a block of options preceded by the -o argument: username, password and SMB version. Note that in this case we are employing vers=2.0 which means use SMB2. This should ensure compatibility with almost any fairly recent Windows version share.
mount -t cifs //192.168.33.201/test-data -o username=administrator,password=*********,vers=2.0 /mnt/XSI/smb/bak1
/!\ Note that we are mounting the share to /mnt/XSI/smb/bak1. Keep the structure for mounts under /mnt/XSI in sake of keeping some order.
Mounting a Windows share over a firewallThe CIFS protocol works over the TCP/445 port. That port alone should allow you to connect to some samba share by IP. If you need name resolution you will have to add 137/UDP, 138/UDP and 139/TCP. Still, the same considerations as with NFS arise regarding security, as CIFS is not encrypted by default either. Thus, using a VPN when mounting over an insecure network is a must. Backing up your VMs to the newly created mount pointOnce you have created your mount point in the ©XSIBackup-App file system, you can start backing up or replicating your VMs there. The resulting mount point is local, thus you can simply use some command like this. Note that we have added repo01 as the name of the repository where to store the backup deduplicated data. If you instead want to copy the VMs as they are you can replicate them as in the second example
xsibackup --backup "VMs(LINUX01,WIN10-02)" /mnt/XSI/smb/bak1/repo01 --backup-host=a.b.c.d
xsibackup --replica "VMs(LINUX01,WIN10-02)" /mnt/XSI/smb/bak1/replicas --backup-host=a.b.c.d
In the above examples we are backing up VMs LINUX01 and WIN10-02 sitting at host a.b.c.d. To backup the VMs from a.b.c.d, you need to have previously added the host to the backup hosts pool, using the GUI or the command line |


|
Login • Available in: 