|
Last updated on Friday 12th of May 2023 01:30:35 PM ©VMWare ©ESXi Enable Jumbo FramesIncrease the payload of your network packets to improve throughput
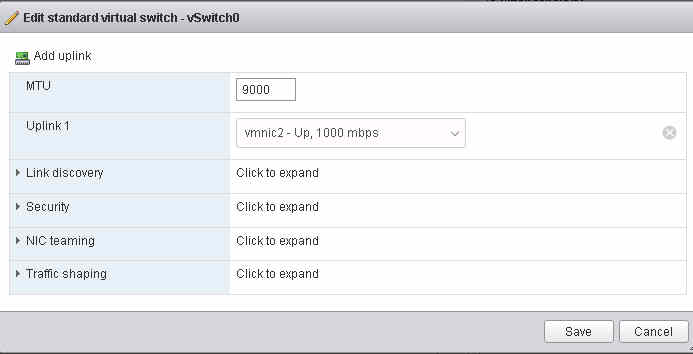
Jumbo frames are a feature of Ethernet networks that allow for the transmission of larger packets of data than the standard Ethernet frame size of 1500 bytes. Jumbo frames typically refer to packets that are larger than 1500 bytes, with common sizes being 9000 bytes or 9014 bytes. Using jumbo frames can offer several advantages in network performance. By allowing larger packets of data to be transmitted, the overall network throughput can be increased, as there are fewer overheads associated with each packet, and fewer packets to transmit the same amount of data. This can be particularly beneficial in high-bandwidth applications such as data center interconnects and storage area networks. However, using jumbo frames can also have drawbacks. Not all network devices and applications support jumbo frames, so enabling them can create compatibility issues. Additionally, jumbo frames can increase the amount of network congestion, as larger packets take longer to transmit and can create more data collisions in the network. To use jumbo frames, all devices in the network path must support the feature, including network adapters, switches, and routers. Jumbo frames must be enabled consistently across all devices to ensure that they work properly. Configuring the MTU size in ©ESXiIn case of ©ESXi there are a couple of places where you will need to change the MTU size: in the vSwitch and in the virtual NIC configuration. Below a screenshot showing the edit properties window of the default virtual switch (vSwitch0) in ©ESXi.
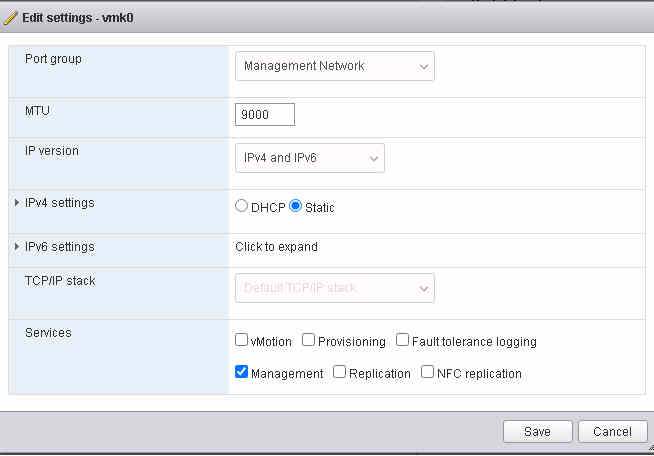
Below a screenshot showing the edit properties window of the default virtual NIC (vmk0).
Of course you will need to change this in whatever physical switch you use in your network and also in the physical NICs installed in the remote end of the IP link, typically a backup server. Most non manageable switches will not need any tweaking, but if you are using some managed device and/ or vLAN feature, you will most probably need to look for the MTU configuration and change it in the physical switch too. We will find out when we check whether the new MTU size is really working or not. Configuring the MTU size in Linux and WindowsAlthough in the context of an ©XSIBackup backup scheme you will normally use some Linux server as the backup backend below you will find the way to change this for both Windows and Linux systems. Windows
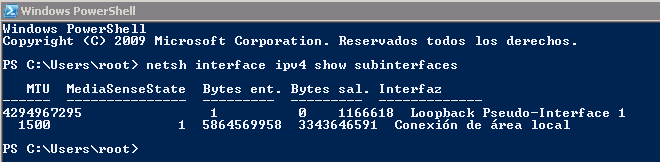
netsh interface ipv4 show subinterfaces
The above command will produce some output like this in a Power Shell command line where you can see the configured MTU value for each NIC in your system.
To change the configured value run the comand below, then run the command above again to check whether the value has indeed been changed.
netsh interface ipv4 set interface "NIC name" mtu=9000 store=persistent
The NIC name is the one you see in its description in the control panel network subsection. Linux Depending on the Linux distro that you are using you can use an ip command or the classic ifconfig command to retrieve the configured MTU size. Our Linux distro family reference is RHEL, CentOS, Fedora, Rocky Linux, Alma Linux, etc..., most of these systems have the ip command installed by default, thus we will use it in our examples.
[root@backupsrv ~]# ip addr
1: lo: <LOOPBACK,UP,LOWER_UP> mtu 65536 qdisc noqueue state UNKNOWN group default qlen 1000 link/loopback 00:00:00:00:00:00 brd 00:00:00:00:00:00 inet 127.0.0.1/8 scope host lo valid_lft forever preferred_lft forever 2: eth0: <BROADCAST,MULTICAST,UP,LOWER_UP> mtu 1500 qdisc pfifo_fast state UP group default qlen 1000 link/ether fa:16:3e:71:06:7e brd ff:ff:ff:ff:ff:ff inet 54.37.75.233/32 brd 54.37.75.233 scope global dynamic eth0 valid_lft 64076sec preferred_lft 64076sec As you can see above, the default configured MTU size for the eth0 NIC is 1500 bytes. To change it to 9000 use the command below.
ip link set dev eth0 mtu 9000
Again, to check whether the new value was configured reissue the ip addr command. Check the new MTU size is workingLinux
ping -M do -s 8972 a.b.c.d
Windows
iping -f -l 9000 a.b.c.d
Where a.b.c.d is the IP of the remote peer. Please, note that in Linux ping command we have to subtract the size of the IP header while in Windows you pass the whole value including the headers. |


|
Login • Available in: