


©XSIBackup - Tutorial - PART II <PART I>
 Please note that this post is relative to old deprecated software ©XSIBackup-Classic. Some facts herein contained may still be applicable to more recent versions though.
For new instalations please use new ©XSIBackup which is far more advanced than ©XSIBackup-Classic.
O.K., at this point we have a working ©XSIBackup installation. Lets see what ©XSIBackup can offer us in terms of backup programming.
4 - Installing & using ©XSIBackup's cron.
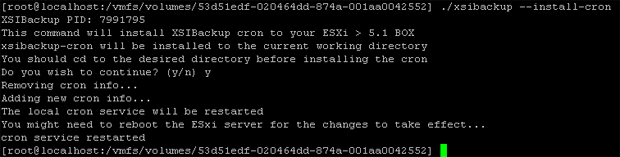
Now you probably want to schedule a daily backup of all your VMs, or maybe only some of them. This can be achieved with the ©XSIBackup's cron system. First of all we must install it by issuing the command --install-cron
# /vmfs/volumes/datastore1/xsibackup-dir/xsibackup --install-cron
From ©XSIBackup 11.0.0, the crontabs are stored in the xsi-dir/conf subdirectory. Previous versions of ©XSIBackup would use a file named xsibackup-cron in the very same dir ©XSIBackup was installed to. The crontabs host the lines that schedule the programmed backups. If you want to know more about how ©XSIBackup cron subsystem works you can take a look at this post: http://33hops.com/xsibackup-cron-how-to.html
All versions newer than 11.0.0 use a classic Linux crontab stored in the xsi-dir/conf directory. You should always use the root crontab (xsi-dir/conf/root-crontab), unless you have a very good reason not to, and you know how to configure other users to have full permissions on files.
After editing the xsi-dir/conf/root-crontab file, you must run the --update-cron command to have those changed transmitted to the ©ESXi crontab.
5 - Differential delta backups with Rsync
©XSIBackup cannot only make full hot backups of your VMs to a datastore within your ©ESXi box, it can also use Rsync to make differential backups to another ©ESXi box over a TCP/IP network, thus allowing to keep mirrored data in a secondary ©ESXi system that you can use to create a disaster recovery solution.
It is highly recommended that you use the --certify-backup=yes argument after performing a differential backup. This will make sure that virtual disks are identical on both sides of the mirrored set by using an SHA1 checksum.
To make a differential backup with xsibackup-rsync you must first link both servers, this can be done with the command --link-srv=[IP of secondary ©ESXi box], you should get an output like this:
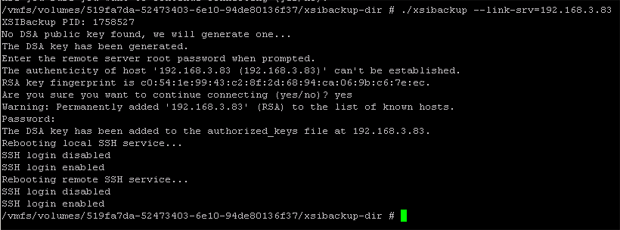
Once this command has been executed you should be able to SSH to the linked server without a password. Run this command from the ©XSIBackup install directory and verify that you can SSH passwordlessly.
# ssh -o StrictHostKeyChecking=no -i xsibackup_id_dsa root@[IP of secondary ©ESXi box]
If you get into the other ©ESXi system without being asked for a password both servers are linked. Type exit to disconnect from the second box and get back to your main server's command line prompt.
For more details about ©XSIBackups SSL functioning you can read this post: http://33hops.com/xsibackup-ssl-link.html
Now lets make a differential backup...
# /vmfs/volumes/datastore1/xsibackup-dir/xsibackup --backup-point="192.168.3.83:22:/vmfs/volumes/datastore1" --backup-type=custom --backup-vms=LINUX01
Obviously the first time we copy the VM, there isn't any differential checksum calculation, as all data has to be copied. Once the first copy finishes, you can log into the just copied VM and download some additional data for testing purposes. Lets say you downloaded a Linux installation .iso file and added 600 mb. to your system. Now you can run the very same command again. This time you will observe that Rsync compares the .vmdk files on both sides (this can take some time) and after calculating the difference the transfer is done much faster, as only the changed blocks are sent.
Now you can set your delta backup in the cron file "xsibackup-cron" the same way you would program a local backup.
Go to first page

