


©XSIBackup - Tutorial - PART I <PART II>
 Please note that this post is relative to old deprecated software ©XSIBackup-Classic. Some facts herein contained may still be applicable to more recent versions though.
For new instalations please use new ©XSIBackup which is far more advanced than ©XSIBackup-Classic.
Many people have asked us for a thorough tutorial about ©XSIBackup usage. It is quite clear that we have designed ©XSIBackup to be a friendly application for those of you familiar with Linux executables. For that particular subset of users the man page (http://33hops.com/xsibackup-help-man-page.html) should be more than enough.
This article goes for those of you not very familiar with the architecture of ©ESXi OS or Linux OSs in general, but that do have the skills to enable the SSH shell and run basic commands in a command line environment. If you are an average Windows or desktop user with some limited server administration skills you should follow this tutorial. In any case ©XSIBackup is a tool designed for engineers and administrators that are familiar with the concepts, protocols, services and tools involved in ©XSIBackup's usage environment.
TOOLS:
- VSphere Client: there is an executable for each version of ©ESXi downloadable at ©VMWare's site. You can find the link to download it in the ©ESXi's HTTP server's main page:
http://[IP of your ©ESXi server]
ESXi 6.0: http://vsphereclient.vmware.com/vsphereclient/VMware-viclient-all-6.0.0.exe
- Putty: the well known SSH client (among other protocols). It will allow us to connect to our ©ESXi box and run commands with cut & paste support. It's a great tool, thanks to the Putty project team.
You can download putty at: http://the.earth.li/~sgtatham/putty/latest/x86/putty.exe
THE TUTORIAL:
1 - Enabling the SSH shell.
The first thing to do is enabling the SSH shell by using the VSphere Client (you should have installed it by now), so that we can enter the ©ESXi command line and install ©XSIBackup. There is already an article covering that topic at:
http://33hops.com/blog_xsibackup-quickstart.html
2 - Installing ©XSIBackup.
Once you have root access to the ©ESXi shell you can install ©XSIBackup, but before proceeding lets stop and make ourselves some questions.
Q: Where should I install ©XSIBackup to?
A: To any persistent path in the ©ESXi OS. Not all paths are kept across reboots so you have to make sure that you install ©XSIBackup to a place where it will "survive" a reboot. Any datastore root or subfolder should do the trick. If you know any other persistent path that you like you can use it, but it's your personal choice and your matter to make sure you are making the right choice.
We have designed ©XSIBackup to be able to handle interstitial spaces in paths, in any case there are some tools like the built in binary of busybox, that provides most of the command line utilities in ©ESXi, that seem to have trouble with spaces in some particular scenarios, so: do not use spaces in your paths unless there is a troop of guys pointing at you with their guns and ask you to. Come on nerds!, we are system's engineers or at least system administrators or at a minimum we pretend to be taken by one. The stage of our lifes in which we would choose names like "this is a beautiful folder where i will install XSIBackup" should be over forever. Those of you with a lower level programming background do know exactly what I'm talking about.
Now that you know the place you are installing ©XSIBackup to; cd to that folder:
# cd /vmfs/volumes/datastore1/xsi-dir
Upload with any SCP client: linux scp command, WinSCP, or any other... Once the .zip file is inside your installation folder, just unzip it and assign execute permissions.
# unzip xsibackup.zip && chmod -R 0700 xsibackup bin
At this point you should have an ©ESXi system with ©XSIBackup installed to it.
3 - Testing ©XSIBackup.
Now we can start to try ©XSIBackup out, lets begin by issuing a very basic command. Simply call ©XSIBackup without any argument like this:
# ./xsibackup
Or like this:
# /vmfs/volumes/datastore1/xsibackup-dir/xsibackup
The second way we called ©XSIBackup is the most interesting (as it's an absolute path) and the one we will be using in the xsibackup-cron file later on, so keep this in mind.
If you executed the above correctly you should have ©XSIBackup's help on screen by now:
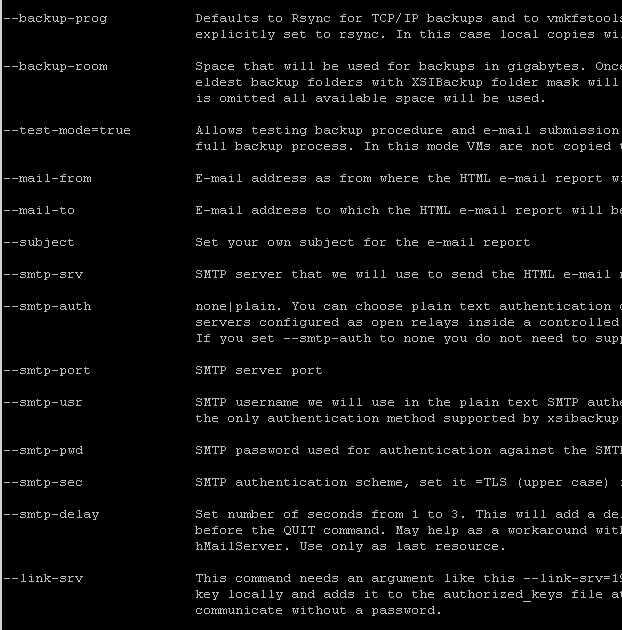
Now you can make your first manual backup by issuing this commands:
First of all we will create a folder in the path /vmfs/volumes/datastore1/backup to make our first test backup
# mkdir /vmfs/volumes/datastore1/backup
# /vmfs/volumes/datastore1/xsibackup-dir/xsibackup --backup-point=/vmfs/volumes/datastore1/backup --backup-type=running --date-dir=yes --mail-from=email.sender@yourdomain.com --mail-to=email.recipient@anotherdomain.com --smtp-srv=smtp.yourserver.com --smtp-port=25 --smtp-usr=username --smtp-pwd=password
At this point you should have your first backup at /vmfs/volumes/datastore1/backup and you should have received an e-mail report at email.recipient@anotherdomain.com
If everything went O.K. you should see your VMs folders at /vmfs/volumes/datastore1/backup
GREAT!, at this point we have a working ©XSIBackup installation and can start to configure it to program our backups.
Go to second page

