

|
Last updated on Sunday 7th of August 2022 07:41:41 AM ©XSIBackup InstallationHow to install ©XSIBackup in ©VMWare ©ESXi ©Hypervisor©XSIBackup is installed through SSH. Before you can install the software you must enable the SSH protocol in your ©ESXi host. 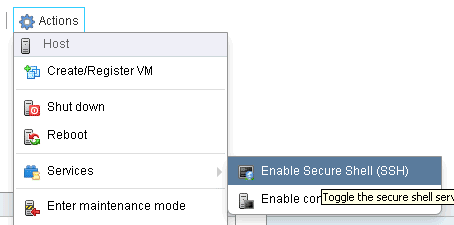
SSH is the de facto industry standard secure protocol to access any kind of computerized device. It is indeed your most secure option to access your ©ESXi server. Here is a detailed explanation of every step you must take to install it into any ©ESXi 5.5 or above box: 1/ Download the Free .zip package from our server. 2/ Upload it to the /tmp dir in your ©ESXi Hypervisor. You can use any SSH/SCP tool, such as WinSCP. Configuring a connection to your ©ESXi system is trivial, just add the IP, user name and password choosing SCP as the connecting protocol. 3/ Use some SSH command line tool to access the ©ESXi Hypervisor's shell. It's just like accessing any Linux/Unix or MAC os using a terminal. There are a lot of SSH clients out there, our favourite tool to run from a Windows desktop is Putty. 4/ Once you are connected to the remote ©ESXi shell, cd to the /tmp dir and unzip the downloaded file that you previuosly uploaded using WinSCP. 5/ Run ./install and accept the prompts. Install to the default dir /scratch/XSI/ unless you have a very good reason not to. 6/ Change dir to /scratch/XSI/XSIBackup-DC and start using. Below you will find the detailed text output from some installation. Installing a licenseIf you have bought one or more license keys, you can install them from the command line. The process consists in generating a request.key file, uploading it to our license server and downloading the license.key file to be uploaded to the installation dir in your ©ESXi box.1/ Generate the request.key file from the command line. You can do it as many times as you want, overwriting the existing request.key file will not invalidate a license. From the installation dir (/scratch/XSI/XSIBackup-DC): 2/ Use WinSCP to download the just generated request.key file to your computer and use a browser to upload it to our license server from the User Area 3/ Wait some minutes until our license server generates your license.key file and download it with your browser to your computer. It will usually have a long name containing the main MAC address of your ©ESXi host. 4/ Use WinSCP to upload the license.key file to your installation dir at your ©ESXi server. Listing the contents of your installation dir should look something like: 5/ Check your license 6/ And finally rename your license key file to license.key. You can just copy it duplicating to the new name just to keep a copy of the original key. |


|
Login • Available in: 