

|
Last updated on Monday 28th of February 2022 08:52:48 PM ©XSIBackup: backup to local RDMUse local RDM disks to store your backupsWhen it comes to store your deduplicated backups, you need a fast FS. VMFS is OK to replicate VMs to, it's not an adequate file system to store your ©XSIBackup --backup repositories though. The reason is simple: it's rather slow. Why?: cause it's not optimized to store millions of small files but on the contrary to host a few huge files.It's clear that you need to store your deduplicated backups to some fast file system: we have found ext4 and XFS to be the most adequate for the job. You want to try other FSs?: great, do and share your results with the rest of users in the forum, but please do use some of the recommended file systems to store your production backup repositories, who wants to play Russian roulette with their valuable data?. 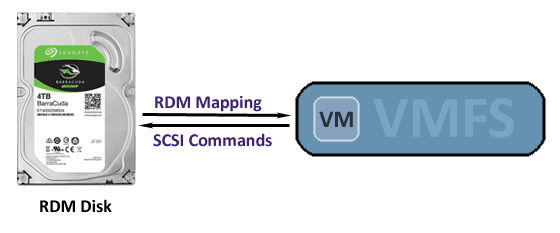
What are my options?
In this post we will cover the latter scenario: "Using an RDM local disk to store backups". This is a rather simple operation: first thing to do would be to create the RDM mapping and the associated .vmdk file descriptor. This will create a .vmdk disk that you can mount in any VM. In our example we will keep things simple by storing the file descriptor along with the VM in its main folder, where the .vmx file is stored. Adding the RDM disk to ©XSIBackup-NASAs said, any Linux distro is suitable to create a virtual NAS device. We have prepared a value added appliance called ©XSIBackup-NAS for you to be able to quickly deploy these kind of auxiliary systems. We will learn today how to add the RDM disk to it.Start by downloading ©XSIBackup-NAS from Sourceforge.net, It's a roughly 1GB download. You can unzip the package in some Windows or Linux desktop to then upload the .vmdk and .vmx files to some ©ESXi host, or you can upload the .zip file to the host and use the unzip binary present in ©ESXi. You may receive a "short read" warning at the end of the process. This is a bug in the unzip utility present in some ©ESXi hosts, still the uncompressed files should be OK. Once the VM package has been unzipped to its destination folder just register the VM as you would do with any other pre-existing one. 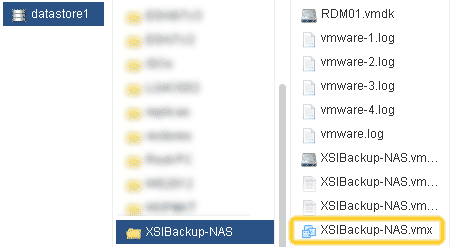 This appliance has been created using CentOS 7.0, which is a very stable distro that eases deploying this type of systems. It is HW version 9.0, thus it is compatible with any ©ESXi host
out of the box from version 5.5. You can off course upgrade the virtual hardware if you will, once you have deployed it as you need.
This appliance has been created using CentOS 7.0, which is a very stable distro that eases deploying this type of systems. It is HW version 9.0, thus it is compatible with any ©ESXi host
out of the box from version 5.5. You can off course upgrade the virtual hardware if you will, once you have deployed it as you need.
©XSIBackup-NAS has a simple GUI that allows to quickly deploy local volumes and share them via NFS or iSCSI, as well as to access restore points in backup repositories using XSIFS to restore individual files present in these restore points. In this case we will be adding the disk as a mere block device that can be accessed over IP and we will do it manually, as the GUI is not prepared for this type of configuration. We will now be creating an RDM mapping to a local disk that we will then format from within ©XSIBackup-NAS. Locate the disk you want to useIn ©ESXi as in many Linux systems, the physical disks link with the OS is a file entry in the /dev directory. In case of ©ESXi the disk files are stored at the /vmfs/devices/disks directory.If you use the 'h' modifier along with the 'ls' command, you will get the size of the different disks and partitions present on the /vmfs/devices/disks directory. This will allow you to identify the disk by size. The first column will also contain the size of the disks in Kb. In our case we will be using the disk t10.ATA__ ... __ST500XD0022D1BD142_________ ... _________W2APL5M4 which is 465.8 GB in size.
# ls -lash /vmfs/devices/disks
total 3164737336 0 drwxr-xr-x 2 root root 512 Sep 1 15:26 . 0 drwxr-xr-x 13 root root 512 Sep 1 15:26 .. 976762584 -rw------- 1 root root 931.5G Sep 1 15:26 t10.ATA_____ST1000XD0032D1ER162___ ... ___S4Y4DQP6 4064 -rw------- 1 root root 4.0M Sep 1 15:26 t10.ATA_____ST1000XD0032D1ER162___ ... ___S4Y4DQP6:1 4193280 -rw------- 1 root root 4.0G Sep 1 15:26 t10.ATA_____ST1000XD0032D1ER162___ ... ___S4Y4DQP6:2 969026247 -rw------- 1 root root 924.1G Sep 1 15:26 t10.ATA_____ST1000XD0032D1ER162___ ... ___S4Y4DQP6:3 255984 -rw------- 1 root root 250.0M Sep 1 15:26 t10.ATA_____ST1000XD0032D1ER162___ ... ___S4Y4DQP6:5 255984 -rw------- 1 root root 250.0M Sep 1 15:26 t10.ATA_____ST1000XD0032D1ER162___ ... ___S4Y4DQP6:6 112624 -rw------- 1 root root 110.0M Sep 1 15:26 t10.ATA_____ST1000XD0032D1ER162___ ... ___S4Y4DQP6:7 292848 -rw------- 1 root root 286.0M Sep 1 15:26 t10.ATA_____ST1000XD0032D1ER162___ ... ___S4Y4DQP6:8 2621440 -rw------- 1 root root 2.5G Sep 1 15:26 t10.ATA_____ST1000XD0032D1ER162___ ... ___S4Y4DQP6:9 488386584 -rw------- 1 root root 465.8G Sep 1 15:26 t10.ATA_____ST500XD0022D1BD142___ ... ____W2APL5M4 488385543 -rw------- 1 root root 465.8G Sep 1 15:26 t10.ATA_____ST500XD0022D1BD142___ ... ____W2APL5M4:1 117220824 -rw------- 1 root root 111.8G Sep 1 15:26 t10.ATA_____Samsung_SSD_840_EVO_120GB___ ... ___S1D5NSAF923878M 117219328 -rw------- 1 root root 111.8G Sep 1 15:26 t10.ATA_____Samsung_SSD_840_EVO_120GB___ ... ___S1D5NSAF923878M:1 To create the .vmdk file descriptor and the RDM mapping we will use vmkfstools, below you have the syntax to accomplish that.
vmkfstools -z /vmfs/devices/disks/t10.ATA__ ... __ST500XD0022D1BD142_______ ... _______W2APL5M4 /vmfs/volumes/datastore1/XSIBackup-NAS/RDM01.vmdk
(*) Please note that there is a shorter path: /dev/disks to the disk files, still vmkfstools will not allow that route. Prefix the physical disks paths with /vmfs/devices/disks/ for vmkfstools to allow creating the RDM descriptor. The above command will return nothing, the RDM files will be created at /vmfs/volumes/datastore1/XSIBackup-NAS
/vmfs/volumes/datastore1/XSIBackup-NAS/RDM01.vmdk
/vmfs/volumes/datastore1/XSIBackup-NAS/RDM01-rdmp.vmdk The file ending in -rdmp.vmdk will show the size of the disk, nonetheless it's just a mapping to the real physical disk at: /vmfs/devices/disks/t10.ATA__ ... __ST500XD0022D1BD142_________ ... _________W2APL5M4. You can now add rdm-disk-01.vmdk to the VM disks as an existing device. It will be recognized by the guest's OS and you can partition and format it using any available FS. 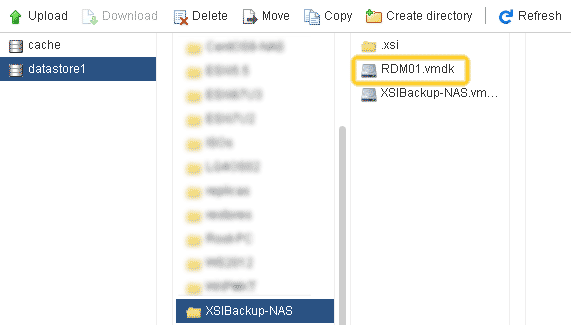
Adding an RDM disk to a VM At the time to add the just created RDM local disk device, you can choose between two functioning modes: Physical or Virtual. We will choose Physical, as it's the one that offers the most flexible compatibility with ©ESXi and other systems. 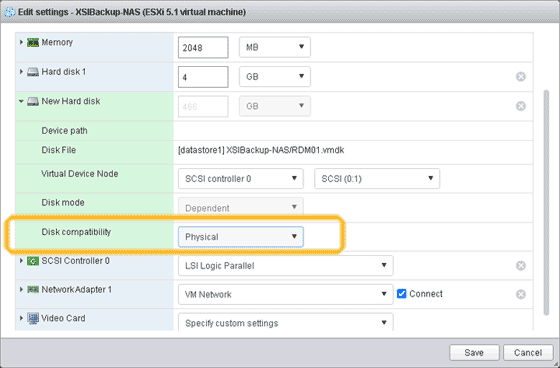
Choosing between Physical or Virtual mode Once you have added the RDM virtual disk to the VM you can switch it on and see the disk from within the guest OS. Remember that the default root password for ©XSIBackup-NAS is "xsibackup".
[root@xsibackup-nas ~]# ls -la /dev/sd*
brw-rw---- 1 root disk 8, 0 Sep 3 05:50 /dev/sda brw-rw---- 1 root disk 8, 1 Sep 3 05:50 /dev/sda1 brw-rw---- 1 root disk 8, 2 Sep 3 05:50 /dev/sda2 brw-rw---- 1 root disk 8, 16 Sep 3 05:50 /dev/sdb You can see the newly added disk /dev/sdb. It still doesn't contain any partition, you will need to create one using fdisk per instance and then format the partition in the disk. You can also format the whole disk device /dev/sdb, still we will pledge to the most common practices in regards to formatting disk devices. Creating a partition and formatting the disk is easy with fdisk or any other partitioning utility.
[root@xsibackup-nas ~]# fdisk /dev/sdb
Using fdisk is out of the scope of this post, it's a fairly simple to use tool that anybody should be familiarized with. If you want to use any other partitioning tool go ahead, just make sure that you create and format a partition in the disk. Even though you can complicate things as much as you want by creating partitions on the ©ESXi physical disks, subpartitioning the disk as seen by the guest, converting it to LVM, creating RAID devices, etc..., we recommend that you keep things simple as much as you can afford to. Take on account that keeping a simple partition scheme on the RDM disk will greatly simplify any recovery operation that you may need to perform using that disk, such as: connecting it to other computers, extracting data, recovering data, etc... Now format the partition, we will be using ext4 FS.
[root@xsibackup-nas ~]# mkfs.ext4 /dev/sdb1
We have already created the RDM mapping as a virtual disk, we have added it to the ©XSIBackup-NAS appliance and the new disk device is available to our NAS virtual device. We just have to mount it in some point of the guest's file system. We use /backup
[root@xsibackup-nas ~]# mount /dev/sdb1 /backup
To automatically mount the disk every time that the system boots add an entry to /etc/fstab
echo "/dev/sdb1 /backup ext4 defaults 0 0" >> /etc/fstab
And re-read the /etc/fstab
mount -a
Now the RDM disk is available to the guest OS. You can use the ©XSIBackup's --add-key argument to stablish an RSA key trust relationship with your ©ESXi host. You can also add any public key you want to the /root/.ssh/authorized_keys file to access the NAS as root or to /home/user/.ssh/authorized_keys to access the NAS device as some user. Still, by just running --add-key action like below, you will achieve that in a much more simpler at the same time than convenient way. Just replace the 1.2.3.4 example IP by your ©XSIBackup-NAS's IPv4.
./xsibackup --add-key root@1.2.3.4:22
(*) The /root/.ssh/authorized_keys file in ©XSIBackup-NAS contains some example keys that you can remove. Now the advantage of RDM in regards to using some regular virtual disk to store backups is that the FS will be faster and so will be the backups too, as there will be less wrapping layers and that you will be able to add the disk to any computer able to read some ext4/XSF file system to access your data. -- By using some free tool like Linux Reader from DiskInternals.com you will even be able to read the ext4 disk from any Windows desktop, even some edition as old as Windows 7 with the disk connected via USB -- If you now create some backup repository under /backup by running some backup from an ©ESXi host and you start to accumulate data
[root@ESXi ~]# ./xsibackup --backup "VMs(SOME-VM)" root@1.2.3.4:22:/backup/repo01
You will see how running some commands like
./xsibackup --check /backup/repo01/20210903123022
./xsibackup --info /backup/repo01 ./xsibackup --repair /backup/repo01 Is many times faster than doing it from ©ESXi on some mounted datastore. You should in fact always run this type of commands from the NAS device OS instead as from the ESXi host, as when run from the latter you will be adding the NFS network latency to the file system calls. The xsibackup binary and any other auxiliary files will be updated to the ©XSIBackup-NAS automatically from the xsibackup client. You don't need to keep them updated manually. Regular Virtual Disk or RDM?That is something you will have to decide on your own. The RDM mapping offers you a way to store your backups in any FS you choose while taking advantage of the speed of s SATA controller, which is well above even a 10Gbps NIC, still you will be limited by the internal IP part of the communication which will be limited by the characteristics of the virtual NIC (10Gbps). You can even use the disk over USB, although SATA is a much more convenient type of connection for intensive I/O.By using an RDM mapping you will be storing your backups to a disk which can be removed and connected to any system able to read ext4/XFS, thus it's extremely versatile at the time to physically move the data around, as it can be read by any ext4 enabled PC and also by any VM that mounts the RDM disk. It's also much faster than moving the data over 1Gbps networks. On the other side, storing your deduplicated backups to a virtual disk will be a bit slower while you will be able to move the .vmdk disk around and attach it to any VM that can read it. Thus an RDM physical volume can be read from a VM or physical PC/server while a regular .vmdk virtual disk will necessarily need to be read from a virtual machine. |


|
Login • Available in: 