

|
Last updated on Tuesday 23rd of May 2023 03:15:18 PM ©VMWare ©vSphere remote management via SSH tunnellingHow to manage a remote ©ESXi server minimizing the attack surfaceThis post is focused in describing SSH Tunnelling in a context in which the target server is an ©ESXi host. Nonetheless you can extrapolate the information in this post to any other OpenSSH server, as SSH Tunnelling is a general purpose feature present in any OpenSSH enabled host. Contents: 1/ Tunnelling from Windows/Putty 2/ Tunnelling from Linux Managing some ©VMWare ©vSphere infrastructure inside a controlled LAN segment with perimetral security is easy you just need to deploy the servers and the vCenter appliance to take full control of the system. When you have some isolated ©ESXi server in some dedicated server with an Internet IP or you must manage some remote infrastructure to give service to a client, some enterprise department or branch, then things become a bit more cumbersome. You can always set a VPN up to gain access to the remote network, but this may not always be feasible, because of time constraints or because the thing just does not justify setting the resources up. 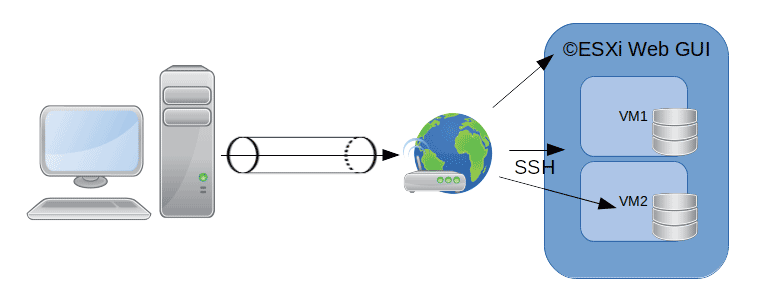 Manage ESXi via SSH tunnelling
Manage ©ESXi via SSH tunnellingA nice and simple way to gain access to any IP in the remote network is via SSH Tunnelling. This is a feature present in OpenSSH and implemented in most SSH clients, including Putty. We will describe how you can take advantage of this characteristic to gain access to any IP sitting in the remote LAN/ WAN segment where the SSH server is sitting at. Tunnelling with PuttyYou already know, or at least you should, how to configure an SSH Client connection in Putty. For this case scenario we will assume you already have a configured Putty connection to some remote ©ESXi host. 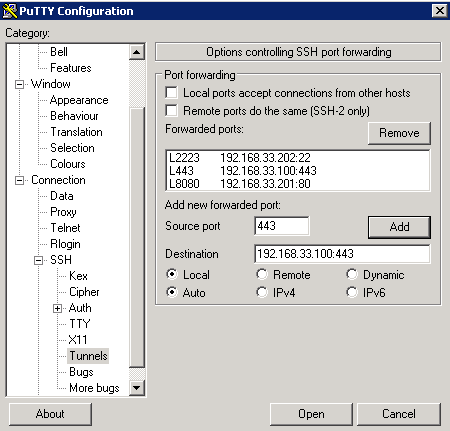
Putty SSH tunnelling We will define the ©ESXi server as having an IP in a LAN segment with the addressing 192.168.33.0/24. You have connected to that server through NAT Forwarding in some perimetral firewall and its IP is 192.168.33.100. If you know SSH but you have never used its SSH Tunnelling feature, you will most probably believe that the stablished SSH connection will just allow you to operate in the remote shell of the ©ESXi host. OpenSSH is much more powerful software though. You can create a mapping between your localhost address and any other IP in the remote LAN segment in such way that you can per instance access the ©ESXi Web GUI through that same SSH connection, even if the gui ports are not open through the NAT firewall. Not only that, you can access any IP:port combination in the LAN segment that you are connected to. You can also connect some remote port and map it to some IP in your network, but in this post we will concentrate in connecting to remote resources from our localhost IP, tipically 127.0.0.1 or the reserved localhost hostname. Open some pre-existing SSH connection that you know is indeed working. Go to Connection => SSH => Tunnels and add a mapping to connect to the ©ESXi Web GUI on the 443 port. The Source port input will hold the port you will be connecting to at localhost. The input box named Destination will host in a row the remote IP address and port you are willing to connect to, e.g. 192.168.33.100:443. You have other interesting options, such as Local ports accept connections from other hosts. This option would allow somebody connecting to the local redirected port gain access to the remote mapping via the SSH Tunnel. Please, note that we have redirected port 443 (HTTPs). In theory we could redirect any port to 443 in the remote ©ESXi host, but for some design reason redirecting some port other than 443 will not work well with the ©ESXi Web GUI. Now you can open the just configured SSH connection with port tunnelling. You should save it first if you want the tunnelling options to remain in the SSH connection profile. Open your browser and type https://localhost, you should be redirected to the remote ©ESXi host's Web GUI. 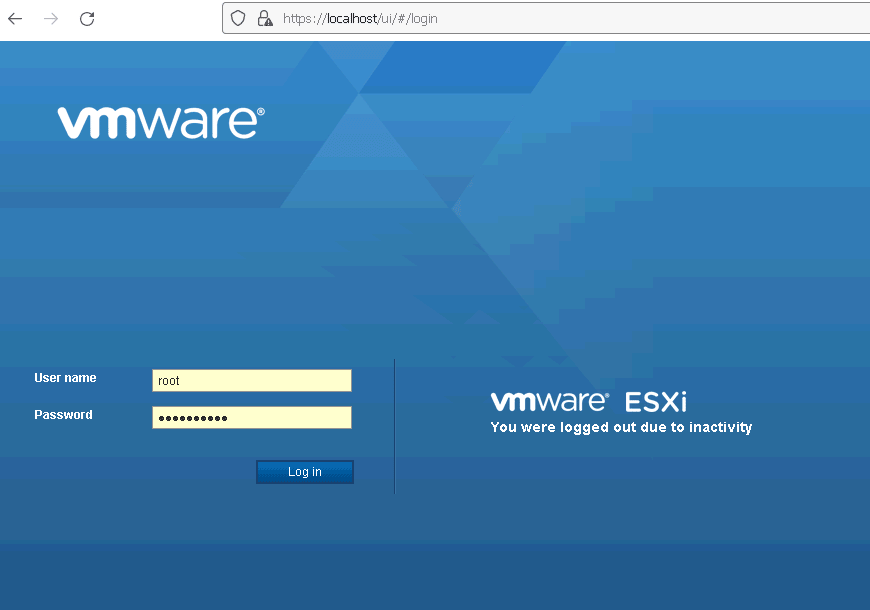
Accessing remote ESXi through localhost You can apply this very same method to access any other device in the network. In the Putty tunnel screen picture above we have configured two additional tunnels: 1/ To a NAS device web GUI at 192.168.33.201:80 from localhost:8080 (you could access the remote web GUI by typing this address in your browser) and 2/ To another SSH server at 192.168.33.202:22 through localhost:2223, configuring a connection to localhost on port 2223 would connect us to the remote SSH server at 192.168.33.202:22 As you have seen tunnelling from Putty/Windows is fairly simple. Let's see how we can accomlish the same from any Linux ssh client from the Linux shell. Tunnelling from LinuxAchieving the same result from Linux is also very simple. You need to use the -L option. Above we pass the following data to the -L option: •The local host's IP (127.0.0.1) •The port to forward •The remote LAN's IP to connect to •The port to connect to Then the rest of the typical SSH connection string. •The SSH username (root) •The internet IP which NATs to the ©ESXi host (a.b.c.d) •The internet port we are connecting to (2222) Please note that we could rewrite the above command as By omitting the localhost IP we are essentially generating a mapping that can be used from any IP bound to our local NIC. This is equivalent to the above Putty option that allows to forward connections from other hosts connecting to your computer. This allows to generate complex topologies and really "twisted" case scenarios, still, this techniques are usefull when you need to perform some seldom work on some remote system or when that remote system is small and can be managed by a single person. As soon as things get a bit more complex, setting up a VPN is a must. |


|
Login • Available in: 