


|
Last updated on Tuesday 17th of May 2022 02:29:44 PM ©VMWare ©ESXi NAT with OpenWRT firewallKeep a secured network of VMs protected by a custom OpenWRT firewall• The base ©ESXi server• The routing device • The OpenWRT appliance • Port Forwarding • Configure for an OVH dedicated server Please, note that other ©VMWare products (Player, Workstation) offer some basic built in NAT (Network Address Translation) feature. ©ESXi also allows you to configure your VMs as NAT as opposed to bridging the NIC to te base ©ESXi IP, but in this case you will have to provide such functionality by using a routing VM, a router appliance.  Download the appliance at Sourceforge. Download the appliance at Sourceforge.
One of the easiest ways to set a VM up in ©VMWare ©ESXi hypervisor is to just configure its NIC as a briged device. This will allow the VM to be accessible through the hosts's NIC. This is very convenient and a good way to learn how to use your Virtual Machines and ©VMWare software in general. If you are keeping your VMs in a controlled LAN segment, then it could even be the method to use in production, as you probably don't need a tight security layer at the ©ESXi host and you have already solved that in your LAN segment perimeter. 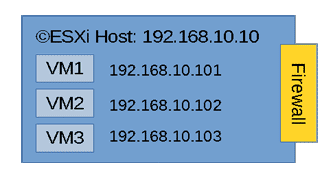 VMs in a bridged network
But, what about when you are going to host your VMs in a dedicated host with an Internet IP?, or when you need to do so in an unsecured LAN segment. In those cases you need to protect from brute force and DOS attacks mainly. OpenSSH will block users after a number of failed logins, still a full fledged FW is a must in an enterprise environment. ©ESXi has a built-in firewall that can help you with some basic filtering, but it has big disadvantages: - It comes with only a set of predefined rules that you can just turn on or off. - The posibility to add your own rules manually has been waived in the last ©ESXi versions in the 6 branch. This leaves you without any possibility to change default ports or open some non-standard port numbers. Fortunately there is a solution to that which consists in interposing a firewall between the outer world and your VMs standing in an inner virtual LAN inside the ©ESXi host. A visual representation of that set up would be as follows. 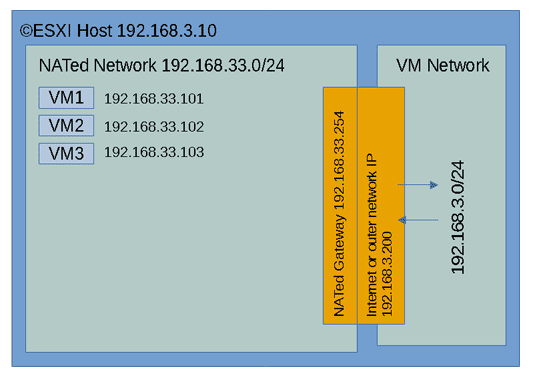 ©ESXi Server with a NATed network
You can change the 192.168.3.0/24 network by some Internet subnet if you will. In some data centres they bridge the Internet IP usually assigned to the ©ESXi host to some internet subnet via a virtual MAC that you have to configure in your user panel. You will find detailed guides for your user case at your data centre website. Here we will pose the case conceptually and offer examples to configure a virtual NAT sub network inside you ©ESXi box accessible via a NAT router. The NAT router will give access to the VMs inside the NAT network via some address in the outer range 192.168.3.0/24, in our example 192.168.3.200 The base ©ESXi serverThe ©ESXi host itself will still be visible to the internet at the Web GUI ports and eventually on the SSH port. Although ©VMWare forces you to turn on SSH after every reboot (there are easy workarounds to that annoying behavior) and warns about it being a security breach. The services that you should be worried about are all the other ones, from the HTTPs GUI to monitoring NTP, etc... If you block all other services or even switch them off and leave the SSH port allowing access only to your IPs, you will drastically reduce your exposed surface attack by leaving just one single port open. If you still want to be able to access your ©ESXi web GUI, you can simply configure your ©ESXi firewall to only accept connections on those services from the NAT01 network. Then use any remote desktop inside to manage your NAT01 network. 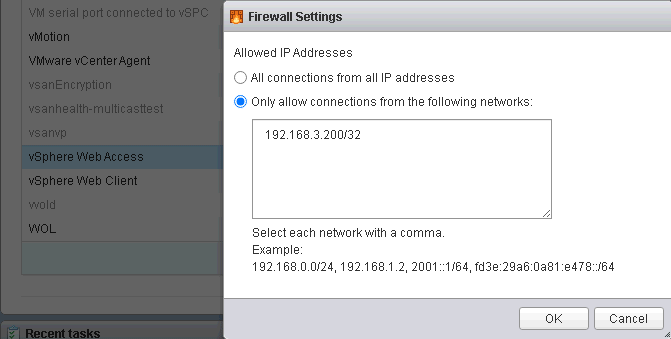
Configure ESXi GUI access in the firewall In the above picture we are limiting access to the ©ESXi web GUI to only the hosts in the LAN01 network, which packets come through the outer leg of the NAT firewall. If you learn to use OpenSSH tunnelling feature, available also from clients like Putty, you will be able to access all IPs in your ©ESXi infrastructure (including other servers) from a single SSH point of access, just keep security high by using long passwords, or even better, use a publick key to authenticate. If you have some dedicated ©ESXi server at DigitalOcean, OVH or some other dedicated server provider, reducing your exposed surface attack on the ©ESXi host's IP by using a single filtered port to access everything else is a good way to minimize existing threats. What routing device do I use to perform the NAT routing between the inner network and the outer one?.The answer is simple: any OS with routing capabilities will do it. Almost all that you can think off. You will usually employ some OS which has been fine tuned to route data: PFSense, OpenWRT, RouterOS, etc.... You probably already have your favourite one, still some Linux VM with multiple interfaces or some FreeBSD with IPTables installed and managed on the command line is the most flexible and capable set up. We have prepared an OpenWRT appliance that you can download and use directly. It is barely 50MB in size once uncompressed and it boots almost instantly. It is a rather capable appliance with almost any professional feature that you can think of. Username: root Password: xsibackup It has been configured with a DHCP WAN interface sitting in virtual switch VM Network (the default in new ©ESXi installations) that will just pick an IP from your regular LAN and an inner NATed LAN interface sitting in LAN01 with the IP 192.168.33.254. You can off course change any of the interfaces configuration to match your network addresses. 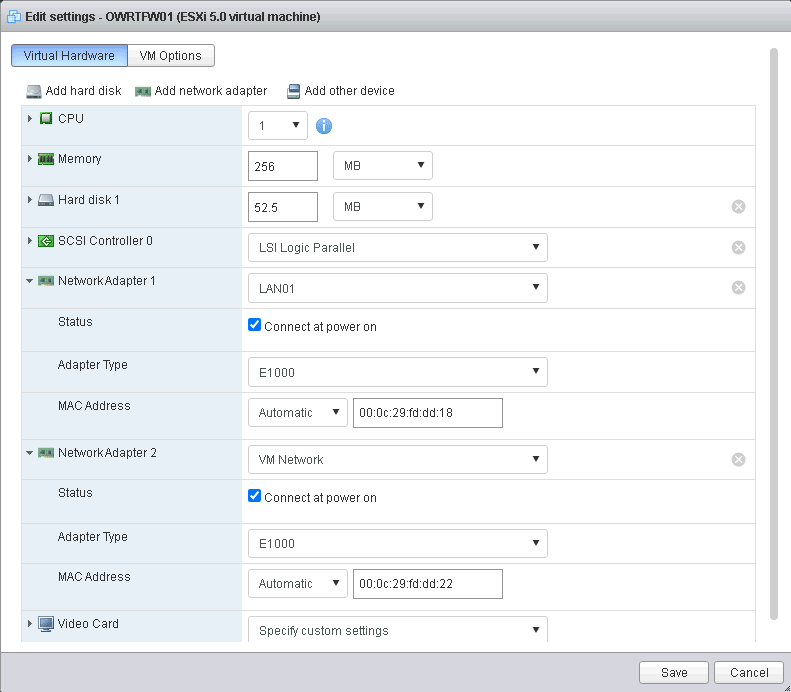
NICs in the OpenWRT device Apart from that we have also added a port forwarding rule that redirects traffic in the WAN IP (192.168.3.200 in the above picture) port 8033 to the LUCI (port 80) web interface of OpenWRT and also port 2222 to the SSH Shell (port 22), both to the IP 192.168.33.254 on the LAN01 side of the router. We arranged things this way so that you can access the router web GUI or SSH Shell from either side of the router appliance, as default behaviour in OpenWRT is to only allow HTTP and SSH connection from the inner leg of the router. You should probably remove those mappings once you are done configuring your production system. The mappings will still work even if you set the WAN IP of the OpenWRT device to some static one. Nonetheless changing that rule is very simple. This kind of scenario will, not only keep your VMs behind an additional firewall, but will offer you a full fledged device without any of the ©ESXi's built-in FW limitations. The appliance comes configured with e1000 virtual adapters for compatibility, you should be able to change them by VMXNET3 adapters in some fairly recent versions of ©ESXi, which will give you 10GB NIC connectivity. In those cases you may also want to assign more CPU and RAM to the appliance, to make sure you can cope with the extended bandwidth. Using the OpenWRT applianceBefore setting up new guests in the NATed LAN01 zone you will need to create the new virtual switch port group to add your NATed VMs to. Just go to Networking => Add port group in the ©ESXi web GUI. 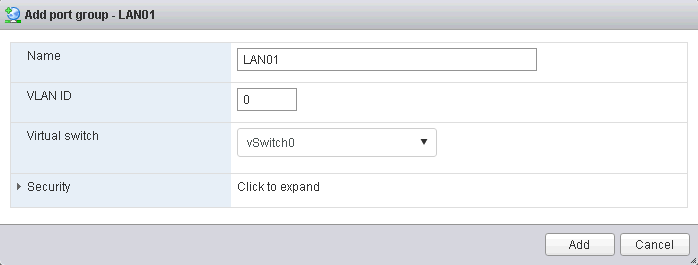
Adding a new ESXi port group You can download the ©ESXi OpenWRT appliance from Sourceforge, installing is a very easy task, just uncompress and register, the virtual hardware version is 8, thus you can use the appliance in any ©ESXi host from 5.0. Upgrade the virtual hardware and assign resources (CPUs and memory) to cover your needs. Now take some VM and set its NIC in the LAN01 port group, then switch the VM on and change the IP/Mask/Gateway to match the default gateway IP in the OpenWRT LAN NIC (192.168.33.254). Some value such as 192.168.33.200/24 and 192.168.33.254 as the gateway will do it. Also, don't forget to add some DNS like 8.8.8.8 if you want to have name resolution in the NATed VM. From this moment you should be able to ping some host in the Internet like 8.8.8.8 from the NATed VM. If you added DNS you should also be able to browse some website by using a browser. Port ForwardingFrom this moment you have created a NATed network that you can use to have some virtual desktops, nevertheless, if you want to host some servers in this network you will need a way to make them reachable from the Internet. 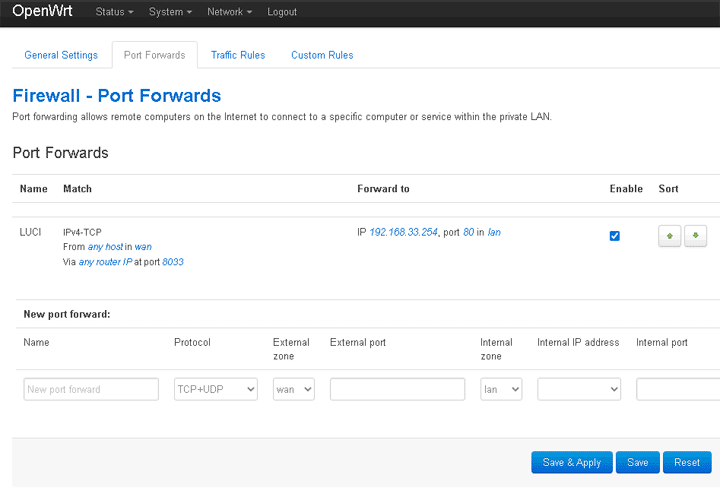 OpenWRT port forwarding
As stated above we have had to set the first port forwarding to make the routing device available from the Internet. In this case the router acts as a web server or at least it's web GUI. The procedure will be much the same for any other server in the NATed network, with the only difference that the IP to which packets will be forwarded will be any other IP in the NATed network NAT01 (192.168.33.0/24) and the port will be any you need to open: 80, 443, 3389, etc... Of course OpenWRT is very capable of doing many other things such as being a VPN server an SSH gateway, etc..., we will leave that up to you. The concept explained here is very well applicable to any other routing device of your choice, such as plain Linux command line, PFSense, RouterOS, etc... There are many different ways that you can secure the system outlined in this post. We suggested a really simple yet efficient one above in this post: close everything but the SSH port and filter it to only allow access from some IPs. This is indeed very efficient, still you may find it cumbersome to set OpenSSH tunnels to access your servers. Another very straight way to manage the servers in the NAT01 network, including the very same ©ESXi host is to create a port forwarding rule to some RDP server in the NAT network. You could use some minimized Windows 10 version like Tiny10 to have a convenient management desktop. You can leave your questions regarding this appliance at the project's forum at Sourceforge. Configuring OpenWRT to be used in OVH/SoYouStart serversAs stated above, you can also use your OpenWRT appliance to serve as the firewall in a dedicated ©ESXi host. Depending on the provider: OVH, SoYouStart, Digitalocean, etc..., the exact mechanism may vary slightly. In the end the only difference to a departmental NAT will be that the outer IP in the WAN interface will be some internet address instead. To make it even simpler we have created a script which is bundled with the appliance that you can just call to add your OVH IP address. But first of all you have to add your virtual MAC to the outer interface of your OpenWRT appliance, which can be easily done through the NIC configuration options in the ©ESXi web GUI. 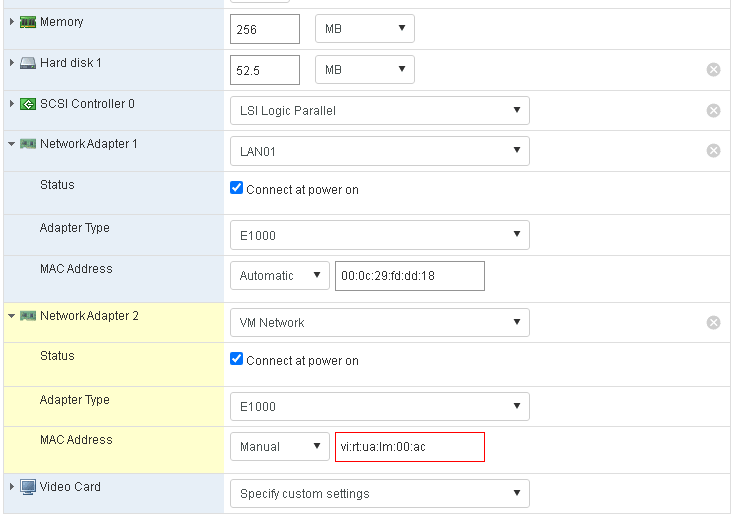 Asign the Virtual MAC to the outer NIC
The Virtual MAC must be added to the second NIC, the one which is in the VM Network virtual switch. Then run the above script. 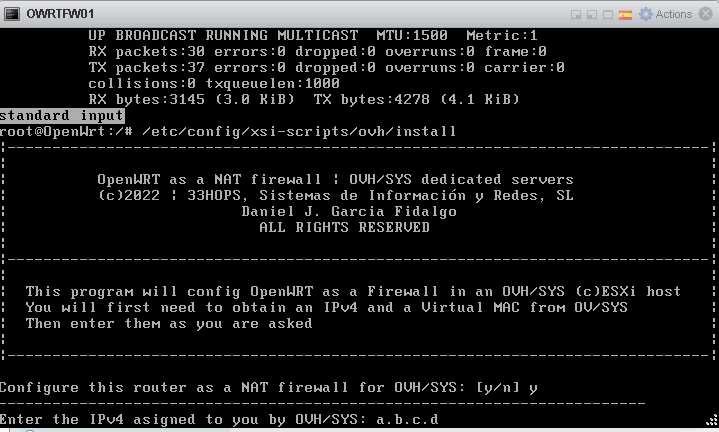 Asign IP/mask of Internet IP
In case of OVH and subsidiaries, they assign you a virtual MAC that you have to apply to the outer virtual NIC of your router and a gateway which is always the last IP in the D class network. If your assigned IP is a.b.c.d, your gateway will be a.b.c.254 Your OpenWRT router configuration at /etc/config/network will be set as follows: The IP v6 options have been removed, the MAC addresses are autoasigned from the hardware footprint, thus you don't need to deal with them in the /etc/config/network file. Backup your VMsNow that you have set your infrastructure up, you will need a way to backup your VMs. You should devise a backup topology that covers most frequent threats: ransomware, warms, malware, etc... The most dangerous threat of all is probably ransomware. Design some backup system that allows you to recover your virtual machines from multiple restore points in time, so that you can go back to a version of them before the guest was infected. ©XSIBackup is our solution to backup ©VMWare ©ESXi Virtual Machines directly from the ©ESXi host operating system to a local datastore or to any remote file system over IP/SSH. It offers block deduplication + compression, so you can host hundreds of restore points in a volume size approximately twice as big as your VM production volume. You can also replicate VMs to have a hot site ready to be used in case of necessity. You can download ©XSIBackup and use it unlimitedly to backup VMs of up to 100GB to local storage or buy a license from 79.00EUR and backup an unlimited number of VMs to any kind of target, local or over IP as well as to enjoy advanced features like CBT, Changed Block Tracking technology. And most important thing, all features work in the free version of the ©VMWare ©ESXi Hypervisor. Other optionsThis proposed scenario can coexist with other virtual networks inside your ©ESXi host. If your hardware is powerful enough, you could host complex virtual networks with multiple firewalls and LAN segments, the possibilities are endless. How to design and deploy your network infrastructure is up to you. You can run multiple instances of the OpenWRT device or add more interfaces to it and route packages between them. You can also add OpenVPN to the router and allow access for roaming users. For more information on how to use your OpenWRT device visit the OpenWRT Official Site |


|