

|
Last updated on Monday 28th of February 2022 08:52:48 PM Linux lightweight deduplication applianceConfiguring the appliance Please note that this post is relative to old deprecated software ©XSIBackup-Classic. Some facts herein contained may still be applicable to more recent versions though. Please note that this post is relative to old deprecated software ©XSIBackup-Classic. Some facts herein contained may still be applicable to more recent versions though.
For new instalations please use new ©XSIBackup which is far more advanced than ©XSIBackup-Classic. Deduplication series:
Before we can start to enjoy our deduplication appliance we must properly configure all the software we have installed so far. First of all we'll edit the Lessfs configuration file /etc/lessfs.cfg. As we can see, there are plenty of options. By now we will just turn off encryption, as we have not installed any encryption libraries, and Lessfs would throw a SEGFAULT. ENCRYPT_DATA=off
Next we'll create a directory where all the filesystem structure is to be shown. For this tutorial I will use /home/lessfs-files, So... # mkdir /home/lessfs-files
Now we will create all the directories to store the database files. We will change the default location, instead of /data we'll change it to /home/data. In CentOS 6.7 the default partitioning reserves most of the space to the home partition. If we left it in the default location /data, only the remaining space of the root partition would be available to store BerkeleyDB data. # mkdir -p /home/lessfs-data/dta && mkdir -p /home/lessfs-data/mta
We also need to copy the following file into /home/lessfs-data/mta wget http://a.33hops.com/downloads/?f=DB_CONFIG.bin -O /home/lessfs-data/mta/DB_CONFIG
As I have changed the default path to the data directories, I have to tell Lessfs where those directories should be sought. That info is stored in the /etc/lessfs.cfg file. 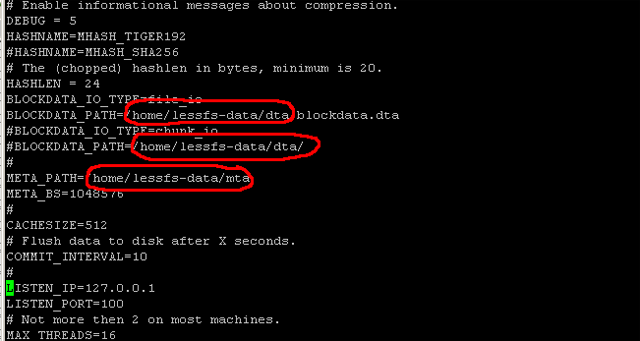
Once we have the directory structure we issue this command to initialize BerkeleyDB # /usr/local/sbin/mklessfs -f -c /etc/lessfs.cfg
If we now inspect the just created folders /home/lessfs-data/dta and /home/lessfs-data/mta, we'll see there are some files there. At this moment we can make a test yet, we will try to start Lessfs service manually with default options and see if it works as expected. As declared in the binary contextual help, the syntax to mount a dir as lessfs is: Usage: /usr/local/bin/lessfs [/path_to_config.cfg] [mount_point] <FUSE OPTIONS>
So, in our case we'll issue: /usr/local/bin/lessfs /etc/lessfs.cfg /home/lessfs-files
Which is: the lessfs main binary, the path to lessfs.cfg and the mount point respectively. If we now issue a plain mount command, we should see our files directory /lessfs-files mounted as Lessfs, something like this: lessfs on /home/lessfs-files type fuse.lessfs (rw, nosuid, nodev, max_read=131072, default_permissions, allow_other)
Between parenthesys we have all the FUSE options, as we didn't parse any, we are using the default ones. At this point we have a deduplicated filesystem, but we still need to make it start with the rest of the services on startup and configure the NFS server, so that we can connect our Lessfs datastore to our ESXi box from vSphere client and start to use it. Let's go on with it... As with any other Linux service, Lessfs can be configured to start with the system. The keystone of this service configuration is the startup script. We cannot delve into the details of how the service initialization works now, so I will just explain what to do. The first thing that we will do is edit the init script that we copied when we installed the precompiled binaries. # vi /etc/init.d/lessfs
We'll see something like this:
...
PATH=$PATH:/usr/bin MKLESSFS=/usr/local/sbin/mklessfs MOUNTPOINT=/lessfs-files LESSFS_OPTS="/etc/lessfs.cfg $MOUNTPOINT" LESSFS=/usr/local/bin/lessfs # By default it's all good RETVAL=0 export DEBUG=0 # See how we were called. case "$1" in start) # Start daemon. echo -n $"Starting $prog: " $LESSFS $LESSFS_OPTS RETVAL=$? echo if [ $RETVAL = 0 ]; then touch /var/lock/subsys/lessfs fi ... The only thing to be done here by now is to change the variable MOUNTPOINT, that should take the value of our actual directory /lessfs-files, and that as I mentioned before will be storing our lessfs filesystem hierarchy. As you can see, when we start the script by means of /etc/init.d/lessfs, like /etc/init.d/lessfs start, or by issuing service lessfs start we are running $LESSFS $LESSFS_OPTS, that is the same as executing the command... /usr/local/bin/lessfs /etc/lessfs.cfg /lessfs-files
...that we used before to make our first test. To make sure Lessfs service starts automatically with the system we issue these last two commands: # chkconfig --add lessfs && chkconfig lessfs on
If we now reboot our system and run a plain mount command, we should see out lessfs filesystem mounted at /lessfs-files We are almost done, the only thing left to do is to configure the NFS service, so that we can connect the datastore from ESXi. CONFIGURING NFS-GANESHA NFS-Ganesha works the same way as the regular kernel space NFS daemon, we should make sure it is configured to start with the system by using chkconfig, so... # chkconfig nfs on
# service nfs start
And now we should configure the /etc/exports file to allow access from our ESXi host. We will allow access to a full class C network, you can do the same or narrow the network mask at your discretion. # echo "/home/lessfs-files 192.168.3.0/24(rw,sync, no_root_squash, no_subtree_check, fsid=0)" > /etc/exports
# service nfs restart
And now the only thing left is to attach our NAS virtual appliance to our ESXi host. To accomplish this: select the root node in the vSphere virtual machine inventory and then select the Configuration tab. In the hardware column select Storage, a list of currently connected datastores will be presented. Click on Add Storage... on the left upper corner and select Network File System... once the add storage windows appears. 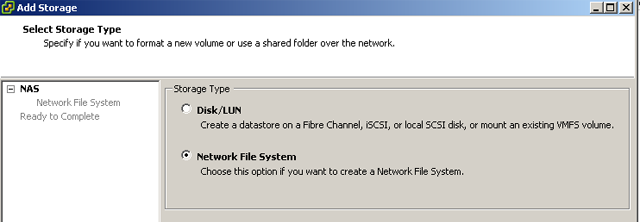
And now we provide our NFS server details... 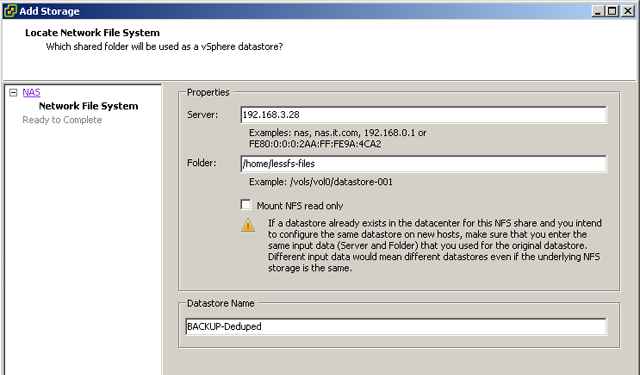
After completing these steps you should see the new datastore BACKUP-Deduped on your vSphere datastore view ready to be used. Happy Deduping!! UPDATE: This appliance will work with as little as a single core and 2 gb. of RAM. To get the best results obviously you should increase those values and also tweak the different parameters available in the Lessfs and BerkeleyDB configuration files. TIPS: - If you want to check that the deduplication is taking place, you can compare the real space used against the expected. Simply run this command to check the data volume of /home/lessfs-data. # du -h /home/lessfs-data
You'll see that if you, per instance, backup the same set of VMs every day, the space used will grow very little from one day to the next, and that you can virtually store un unlimited number of backups. - If you backup relatively small VMs and you have decent hardware you can even fit this appliance in the same VMWare ESXi server where the VMs to backup are. If you have big virtual machines, then you'll achieve the best results by placing it in a different server. - As the database grows, the searches will slow down, you can improve this by adding more memory and/or using SSDs instead of HDs. - If you have problems getting your /home/lessfs-files directory mounted remember to give preference to the lessfs service over nfs at the time of starting them. - You can tweak block sizes, dirs, encryption, compression, etc... in the /etc/lessfs.cfg file. - If you followed this tutorial and got your NAS appliance to work, you are probably thinking of using it, not only as a backup device, but to host your VMs as in a regular datastore. If you do that you'll find that Lessfs requires more CPU and memory to work in a fluent way. Even with powerful hardware you might not get the results you expect. You must take on account what was explained in the first chapter < Deduplication, what to choose > Bibliography:
- The Lessfs home page: https://sites.google.com/a/projectme.org/lessfs/
- Fossies.org: README.berkeleydb - Howtoforge: Lessfs-1.5-on-centos-5 |


|
Login • Available in: 